
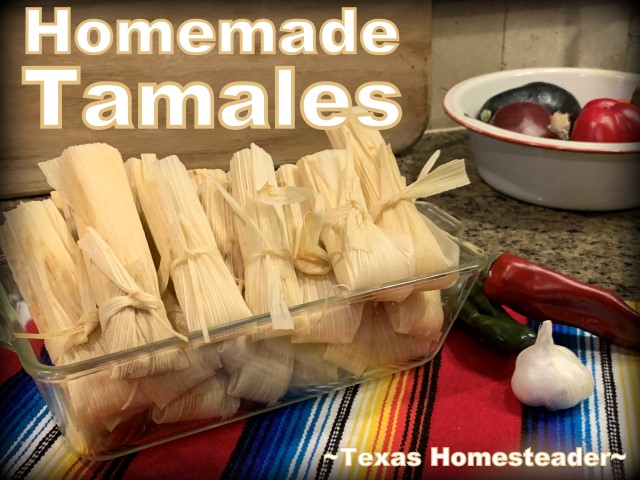
~Texas Homesteader~
*contains affiliate link
Although it takes a little time to make homemade tamales, it’s a very easy process. PLUS I have an Instant Pot shortcut option too! Come see my step-by-step directions complete with photos and recipe.
(Note: Links preceded with * are affiliate links. If you click and buy something I could receive a tiny commission.)
Pork For Homemade Tamales
RancherMan & I love tamales. As a matter of fact, tamales are RancherMan’s favorite Tex-Mex food. And heck with his mad hunting skills, we always have pork in the freezer from the Wild Hogs that cause so much damage to our property.
It’s pretty common for me to cook up all those pork roasts at one time and quickly Shred The Roast with my KitchenAid mixer. That way I have cooked, shredded roast in the freezer at any given time for all manner of our favorite Mexican-themed meals, whether Pulled Pork Enchiladas, even easier Enchilada Casserole or maybe Carnitas Tacos.
But now we were in the mood to make tamales, although we hadn’t made them in about 15 years or so. Time to dust off those skills and put a few tamales in the freezer!
Homemade Tamales Are Simple To Make
First let me say: Yes it’s true, making tamales is time intensive. But what it lacks in time savings it shines in simplicity.
There’s nothing difficult about making tamales. Oh, & although you can totally still steam them for an hour (which is traditional) I’ve shortened the time in less than half by using my Instant Pot shortcut.
Abbreviated Homemade Tamale Instructions:
Here’s the abbreviated instructions if you already have meat cooked/shredded like we do: (otherwise cook & shred the meat the day before)
- Make the chile sauce by simmering peppers, onions, garlic in broth, then puree & strain
- Prepare the shredded cooked meat by adding some of the chile sauce
- Make the masa with corn masa flour, broth, lard & chile sauce.
- Assemble tamales on corn husks – prepared masa, meat & roll up.
- Cook tamales 20 minutes in the instant pot (or you can steam in a large stock pot for 1 hr instead)
See? Nothing hard. But like I said, it does take a little time time.
Advance Preparations
If you don’t have cooked/shredded pork in the freezer, the day before making tamales is a good time to do that.
Cook the pork roasst the way you like it with onions, peppers, etc. But I wouldn’t add any flavors that might interfere with flavors of your tamales. Stick to seasonings like chile powder, garlic, cumin, etc.
Our Pork Roast was Smoked & shredded and placed in the freezer beforehand. So all I had to do is take it out of the freezer to thaw.
The night before is also a good time to prepare your corn husks. The tamales roll up much easier with previously-soaked husks.
We took them out of the bag they were purchased in and submerged them in a large pot of water. Then we placed a slightly-smaller pot on top to weigh them down and left them to soak overnight.
How We Altered Our Shredded Pork
Now traditionally tamales are made with shredded pork. And of course our pork was cooked & shredded already. But I wanted a finer texture to our tamale meat. So we took this extra step, but it’s totally optional.
We took our cooked shredded pork & pressed it through a meat grinder on the coarsest grind blade.

The resulting meat was less stringy and more dense. I think I prefer this texture in the tamale meat. But again, this is an extra step and totally optional.
Making The Chile Sauce
Now your roast is cooked & shredded and your corn husks are soaked & ready to go. Let’s make those tamales!
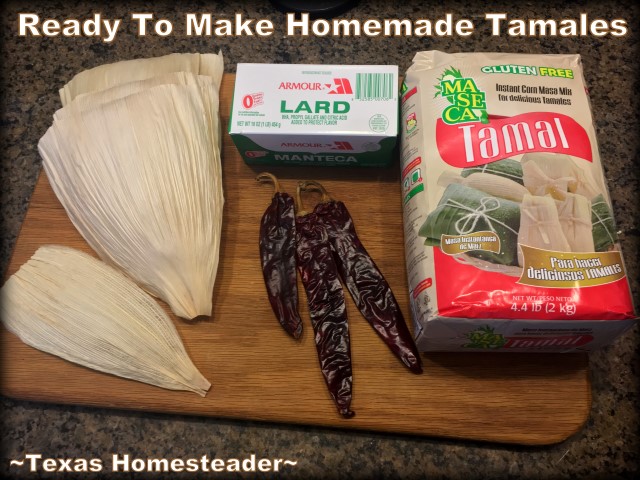
First I made the chile sauce. The resident tamale expert at our local grocery store recommended dried *Guajillo chiles, so that’s what I purchased.
I also purchased a pound of lard, some Maseca Tamal brand of masa corn flour and a bag of dried corn husks. I’d already made a ton of homemade broth so there was no need to buy that.
So to make my chile sauce, into a pot I added 2 cups of my homemade broth, 5 stemmed, seeded & chopped dried Guajillo chiles, a large chopped onion and 3 pressed garlic cloves.
I allowed the mixture to simmer uncovered for 20 minutes.
After that 20 minutes was up, turned off the heat & let the mixture cool. Then I used my *Ninja Blender to puree the mixture as finely as I could.
Finally I used a sieve to filter away any remaining solids.
I was left with a delightful aromatic deep red chile sauce. I’ll use this to flavor my shredded pork and also add a hint of flavor/color to my masa.

TIP: When my simmered peppers, onions & garlic were cooked and cooled I poured some of the liquid into a separate cup before dumping the rest into my blender to make this sauce. I feel the result was a thicker sauce with more concentrated flavor. I still have the liquid that I separated if I need more for my recipe.
Making The Masa
We pulled out one of the blocks of lard and used half of it for our batch of masa. Some say you can substitute shortening here, but I’ve always read lard is best and most authentic. So that’s what we used.
Into a bowl we added 3 cups corn masa flour, a quarter cup of my chile sauce and 1.75 cups of broth. This was all mixed thoroughly to make a soft, firm dough. Then we sat the bowl aside.
Into the *KitchenAid Mixer we added the room-temperature lard, some salt and baking powder and used the whip attachment to whip it until it was completely incorporated and kind of fluffy.
Finally we added the masa mixture and switching to the paddle attachment we blended it all together for about 5 minutes.

Then we covered the bowl of masa and into the refrigerator it went for about an hour. RancherMan felt this chilling of the masa dough made it easier to work with.
When an hour was up we brought our masa back out & once again used the mixer’s paddle attachment to mix it with our KitchenAid.
When we felt it was perfectly smooth and light, we took a small ball of masa dough and placed it in a cup of water. If the masa floats, it’s ready.

Assembling The Tamales
Now it’s show time! We took our soaked corn husks out of the water and placed them in a colander to allow the water to run off of them.
Then we laid several out on a kitchen towel to allow them to air dry a bit more while we assembled the tamales.
To spread the masa on the husks, we experimented with two different utensils – an *offset spatula which worked well, and my *Stainless Steel Scraper which worked well too.
RancherMan preferred the scraper, but our resident tamale expert said she just uses a spoon. So there’s lots of flexibility here – use what’s easiest for you.

We spread the masa in a pattern of about 4″ wide and 5″ long on a corn husk. It’s best to leave some bare husk areas at the top and at least 1/2″ from the sides of the husk to make it easier to roll up and cook.
Then I placed between 1.5 & 2 tablespoons of my prepared meat filling in a line at the center of the masa dough. I used my fingers to quickly shape the meat along the length of the masa.

Folding the Corn Husk
To fold the corn husk I started at one edge and folded it over the meat. I made sure the masa from the edge touched the masa on the other side of the meat, then just continued rolling to the end of the corn husk.
When the husk was rolled I folded the bottom up, starting where the masa ends. This creates a little pocket for your tamale to cook.
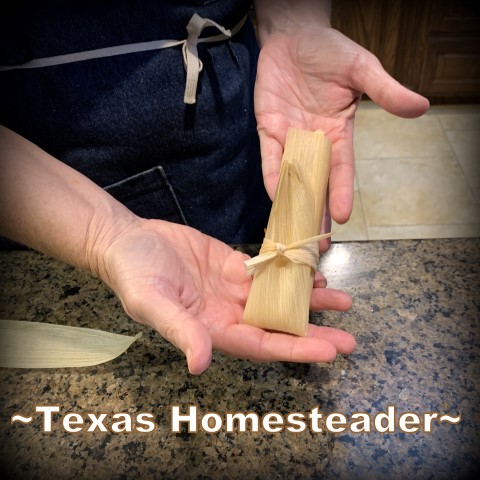
Although it’s optional, I used a small strip of corn husk to tie the tamale in place.


By tying the tamales into place it made it a little neater when placing the tamales in the pot to cook, and also when trying to remove the cooked tamales from the pot.
Cooking the Tamales
Now that your tamales are assembled it’s time to cook them. Traditionally they’re all placed in a steamer pot and steamed for an hour. If you don’t have an Instant Pot, go ahead & steam them in a large pot.
But since I have a *6-Qt Instant Pot I’m using that bad boy now to once again simplify my kitchen tasks!
Instant Pot Shortcut To Cook Tamales
I first put 2 cups of water in the bottom of my IP’s inner liner, then added a metal trivet. Onto the top of the trivet I placed a layer of corn husks that were too small to be used for our tamales. Nothing wasted!
I read it’s best to lean the tamales to keep moisture from accumulating in the open ends. So I placed a small 1/2 pint canning jar in the center to lean them against.
Helpful Hint: I learned that if the jar’s placed open-end down it siphons the water into the jar. So I make sure to place the jar open-end up and it works well.
Now I take all my assembled tamales and place them in my Instant Pot, leaning them against the canning jar. When I had them loaded in, the pot looked like this:

Then I used more of those unused corn husks to put on top of my tamales. This keeps condensation from the IP lid from dripping into them and making them soggy. Just another step to assure your homemade tamales turn out great!
I didn’t want to squeeze the tamales in, just lay them inside lightly. So I could fit about 1.5 dozen tamales in each IP load. That means to cook 3 dozen tamales I only loaded up my *6-Quart Instant Pot twice. So easy!
Pressure Cook Tamales 20 Minutes
Then I put the lid on my instant pot, switched the lever to ‘sealing’ and selected ‘Pressure Cook” for my tamales. I set the time for 20 minutes and then waited.

The Instant Pot will automatically come to pressure and then start cooking for the designated time.
When the timer went off I allowed the tamales to stay in the covered Instant Pot for 10 more minutes before doing a quick release of the remaining pressure.
I opened the IP and used tongs to carefully remove the tamales. They were each placed on a rack sitting atop a cookie sheet to catch any drips.

You’ll need to let your homemade tamales cool at least 10 minutes or so to firm up the masa before eating. Enjoy!

Homemade Pork Tamales
Makes about 3 dozen 5" long tamales
Ingredients
Meat:
- 4 cups Cooked, shredded pork roast
Roja Chile Sauce:
- 5 dried Guajillo chile pepper pods, stemmed seeded & chopped.
- 1 large onion, chopped
- 3 cloves garlic, pressed
- 2 cups chicken broth
- 1/2 teaspoon cumin
- 1.5 teaspoons salt
Prepared Masa
- 3 cups Dry Masa corn flour
- 1.75 cups chicken broth
- 1/4 cup roja chili sauce (see above)
- 2 teaspoons baking powder
- 2 teaspoons kosher salt (or 1.5 teaspoons table salt)
- 1 cup 8 oz lard (1/2 of the 1-lb block of lard)
- additional broth - 1 tablespoon at a time to desired texture
Instructions
Instructions:
Prepare Roast & Corn Husks the Day Before
-
The day before you are to make your tamales, cook your pork roast with onions, peppers, garlic, etc. Stick to Mexican-food seasonings such as chile powder, cumin, etc so the roast flavors won't compete with the flavor of your tamales. Then cool & shred the roast and store in the refrigerator. You'll want about 4 cups of shredded roast for your tamales.
-
Prepare you corn husks the night before by soaking them in water. Use a heavy bowl or trivet to make sure they stay submerged.
Make the Sauce
-
Use rubber gloves to remove stems and seeds from the chile pods. Place chopped chiles, chopped onion and garlic cumin & salt in a saucepan with 2 cups of broth. Simmer, uncovered, for 20 minutes, then remove from heat to cool.
-
When cool, transfer the chiles and water to a blender and blend until smooth. Strain the mixture of all solids and set aside.
-
Mix 1.5 cup of the prepared chile sauce into the 4 cups cooked, shredded meat.
Make The Masa
-
Mix 3 cups Masa corn flour, 1/4 cup roja chile sauce, 1.75 cups chicken broth & mix thoroughly with your hands to make a soft-moist dough. Set aside.
-
Into separate mixer bowl, combine 1 cup lard, 2 teaspoons kosher salt & 2 teaspoons baking power. Mix on medium speed until thoroughly combined & fluffy, about 3-4 minutes.
-
Add the masa mix to the lard mix & using paddle attachment blend until the masa mixture is the texture of hummus or peanut butter. You may need to add broth a tablespoon at a time if it's too dry, or add dry masa flour a tablespoon at a time if it's too moist.
-
Cover masa and place in refrigerator 1 hour to rest & hydrate. Then bring back out and mix at medium speed another 3-4 minutes.
-
(additional chicken stock 1 tablespoon at a time to desired texture if needed)
-
When a small dough ball of masa floats in a glass of water, your masa is ready
Assemble The Tamales
-
Spread about 2 Tablespoons masa dough over the smooth side of the corn husks - approximately 4" x 5" square and about 1/4 inch thick. Place one heaping tablespoon of the meat filling in a line down the center of the masa.
-
Fold one side of the masa-covered corn husk over the meat filling being sure the masa from one side of the meat is touching the masa on the other side of the meat. Then continue rolling the husk to the end. Fold the bottom of the corn husk up and tie with a small strip of corn husk if desired.
Cooking The Tamales
-
Put a trivet on the bottom of the IP and add 2 cups of water. Add a few corn husks to the top of the trivet. Place tamales folded end down on top of the corn husks - I like to lean them inward so they're not straight up & down. Place additional corn husks over top of tamales to keep excess moisture from dripping into them.
-
Cook on high pressure for 20 minutes. Do a natural pressure release for 10 minutes, then use a quick release to release any remaining pressure.
-
Allow tamales to cool 10 minutes before eating them to allow the masa to firm up. May be frozen.
~TxH~
Other Instant Pot Recipes:
- Instant Pot Bone Broth Is Push-Button Easy!
- IP Pot Roast And Gravy – Comfort Food FAST
- Pepperoncini Pot Roast – Only 3 Ingredients
- Homemade Yogurt: Instant Pot Method
- Cheesecake Can Be Made In An Instant Pot
- Homemade Tamales – Faster In An Instant Pot
- Instant Pot Boiled Eggs WITHOUT The Shell!
- Cooking Dry Pinto Beans in An Instant Pot
- Black-eyed Peas w/Spicy Rotel in And Instant Pot
- Instant Pot Goulash – Comfort Food FAST!
See ALL Our Instant Pot Posts!
Want to see other Meal Ideas?
- Poor Man’s Stuffed Steak (hamburger)
- Award-Winning Cowboy Chili
- Slow-Cooker Spicy Sticky Chicken
- Cheesy Spaghetti Squash Lasagne Cooked In Its Shell
- Savory Meatloaf
- Lazy Cook’s Chile Relleno
- Hot & Hearty Cabbage Stew
- Homemade Chicken & Dumplings
- Chicken Pot Pie
- Instant Pot Goulash – Comfort Food FAST!
- Slow Cooker Enchilada Casserole
- Meat-Stuffed Ravioli
- Stuffed Bell Peppers
- Homemade Pasta – Only 3 Ingredients!
- Southwest Chicken w/Seasoned Brown Rice
- Meat & Cheese-Stuffed Zucchini Boats
- Homemade Tamales (includes Instant-Pot shortcut)
- Homemade Meals Every Day – The EASY Way!
- Pecan Smoking A Whole, Spatchcock Turkey
- Quick Southwest Quesadillas
- Meal Ideas When Taking Food To Families
- Taco Spaghetti – Simple 1-Pot Meal
- Leftover Chicken Into Quick Chicken Fried Rice
Pork Roast Recipes:
- Slow-Cooker Pork Roast w/Veggies
- Instant Pot Pork Roast
- Pork Roast w/Red Wine
- Italian-Flavored Pork Roast
- Pecan-Smoked Meat For BBQ
- Simplest 3-Ingredient Pepperoncini Roast
- (Easily Shredding Pot Roast in Minutes)
Recipes Using Leftover Roast:
- Carnitas Tacos
- (MYO Crispy Taco Shells in Minutes)
- Pulled Pork Enchiladas
- Hearty Meaty Stew
- Homemade Tamales
- Pulled Pork BBQ
- (Homemade Honey-Sweetened BBQ Sauce)
See All Our Recipes

C’mon by & sit a spell! Come hang out at our Facebook Page. It’s like sitting in a front porch rocker with a glass of cold iced tea. There are lots of good folks sharing!
And you can also follow along on Pinterest, Twitter, Instagram
To receive an email when a new blog post goes live it’s EASY to
Subscribe to our blog!
We love tamales here too, but this past year we began a Ketogenic Diet for my son, an adult with special needs, so masa is off the menu. I did some research, however, and found an Instant Pot Keto Tamales recipe. It looked simple enough, so I tried it. I used almond four and flax meal instead of masa. I made the dough, soaked the husks, did the whole thing. Then we tried some (I say we, but I meant my son and myself–that Redneck was having NONE of it, especially since the almond flour and flax meal made the tamales look green).
Well…let me just say that while they don’t taste bad…they AIN’T tamales. *sigh* Back to the drawing board. At least there was enough of the shredded pork left to make a pork chili for lunch today!
A dietary change is always a challenge to find the right balance for the foods you love, huh Evelyn? Here’s hoping you find just the right fit. ~TxH~