
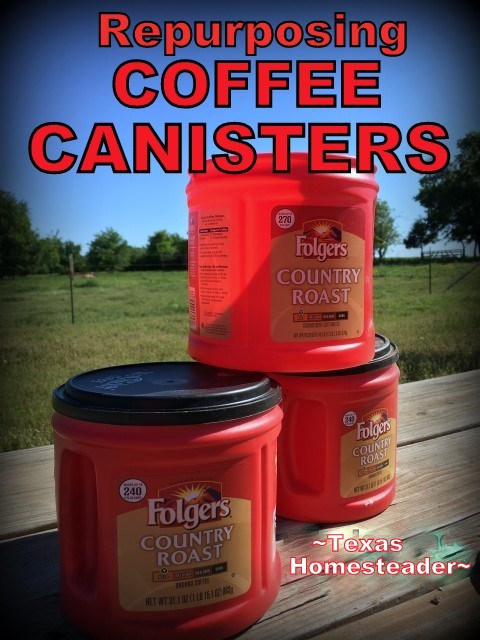
by Texas Homesteader ~
I wanted to repurpose empty coffee cans for decorative food storage. Unfortunately cleaning away the print from the surface of the can was surprisingly difficult. But I was finally successful – come see how!
This post may contain affiliate links (marked with *) If you decide to make a purchase through one of the links contained in this post I may receive a commission. But the price you pay will NOT be changed. It’s an easy way to support this blog without anything coming out of your pocket. So if you’re interested in buying something, don’t be shy – click away! You can read my entire affiliate disclosure under the ‘Legal’ tab above.
Various Coffee Can Repurposes
As bonafide coffee drinkers, we have no shortage of empty coffee canisters to repurpose. Sometimes it doesn’t matter if the print remains on the surface. But sometimes I want a blank canvas.
I’ve written before about repurposing those handy empty coffee canisters to a new life. (You can see a complete list of Coffee Can Repurposes Here)
For some empty coffee can repurposes I use the coffee can as-is, such as:

-
-
-
Holding Bulk Laundry Soap (just add identifying label)
-
Deep Soak Watering In The Garden
-
Garden Harvest Container
-
Food storage – leftovers, dried herbs, etc.
-
Garden Weeding
-
Cute Planter for Sharing With Friends (can paint if desired)
-
-
But for other purposes I need more of a blank slate. And for food-storage purposes I wanted to leave the canister unpainted.
I dunno, it’s probably fine, but I worried about whether with repeated use the paint might fleck off or even get mixed in with our food. To me it just wasn’t worth the risk
Such food-related but decorative coffee can repurposes such as:
-
-
-
Flour Canister for kitchen
-
Cute Country BreadBox
-
-

Removing The Print On A Coffee Can
I found removing the print proved to be much more difficult than I thought.
Scrubbing the canister, using nail polish remover, paint thinner – even a straight-edge blade wouldn’t remove that print!
Hummmm… this is going to take a little more investigation…
Sneaky Trick To Keep Us From Removing Print!
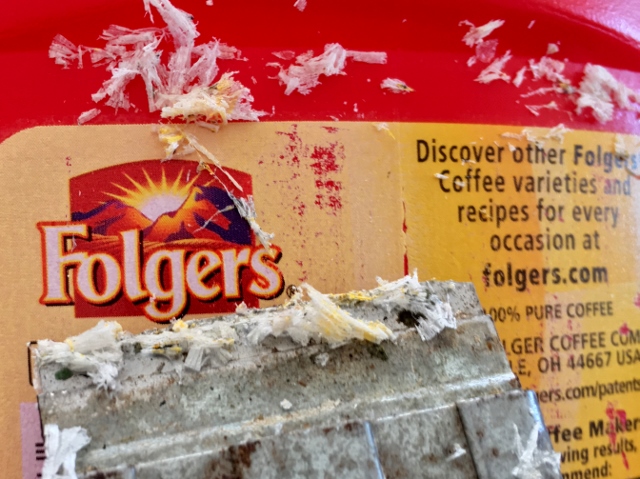
As I was using a straight-edge razor blade to attempt to scrape off the writing I noticed a curious thing.
The color of the writing was staying, but I was scraping away a clear coating over the print.
Aaaaahhhh… Sneaky, Folgers! So that’s why my efforts to remove your marketing weren’t working!
1st Step To Removing Coffee Can Print: Clear Coating
My first line of defense was to remove that clear coating so the advertising-printed surface could be exposed.
This was actually the easiest step of all. The razor was simply used to scrape the entire clear surface of the printed area.
Now that my advertising print area is exposed, let’s see how to get that print off.
Removing The Print – Using Nail Polish Remover
A rag dotted with nail polish remover followed by vigorous scrubbing was only moderately successful at removing the print.
Dang, this is going to take all day! What have I signed up for, here? Sheesh!
So I placed an old rag over the printed area and saturated it with nail polish remover. I allowed that saturated rag to sit and do it’s thing for a few minutes before attempting again.
This time it was more successful. The print was softened and the razor was able to scrape it off much better. It still took quite a bit of doin’ to get all the print removed.
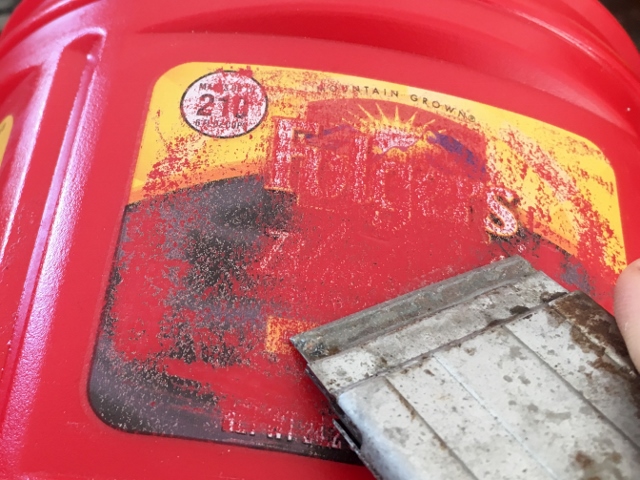
But even then it still didn’t leave a clean surface. Now there was a gooey semi-colored layer remaining that the nail polish remover just wasn’t taking off.
(shakes fist in the air) Dang Folgers, what are you doing to me here??!!
Finally Removing The Rest Of The Print
Hearing my frustration, RancherMan came over to investigate. He mentioned that Goo-Gone is supposed to be good at removing sticky residues.
Alrighty then, let’s give that a try. I mean, I’m already pretty time-invested here #aminot?
A little goo-gone sprayed on the surface and allowed to sit for a minute or so followed by a vigorous rubbing finally garnered success!
Steps To Successfully Remove Coffee Can Print
In the end, removing the print from that coffee canister was more time consuming than I thought it would be.
Finally clearing all the print required a three-pronged approach:
-
-
-
Scrape Away Clear Coating With Razor
-
Soak With Rag Saturated With Polish Remover
-
*Goo-Gone to Remove Residue
-
-
Cleaning The Coffee Cans
After those three steps I brought my canister into the house and wet it down with my spray bottle of grease-cutting soap cleaner. Then I sprinkled the surface with baking soda using my repurposed shaker that I keep under the sink.
My homemade pot scrubber gave a thorough cleaning followed by a quick rinse. Finally, all done!
Although removing the paint took some time & elbow grease, I’m really glad I did it for my next projects.
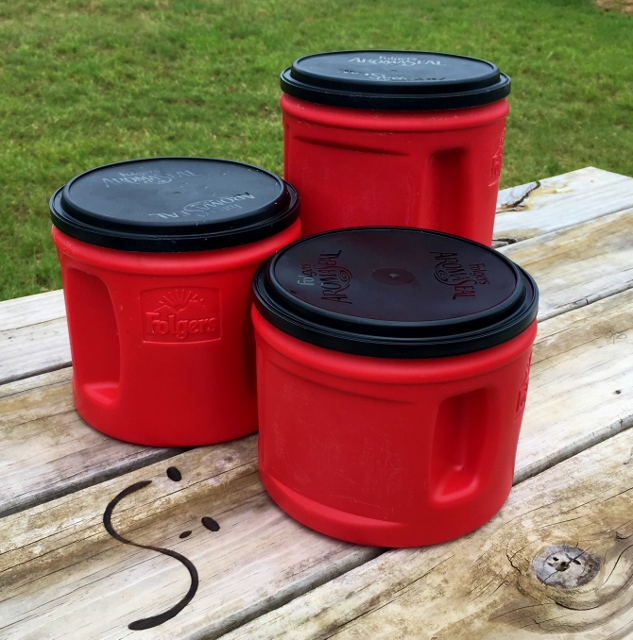
Food-Themed Coffee Can Repurposes
I’m using coffee canisters to make a simple, vintage-look bread box as well as a flour canister for my Homestead kitchen.
Since the can’s surface area has been cleaned of any product printing, I can use cute chalkboard labels and permanently write on them using a white paint pen.
I love the way they turned out. And since the canisters don’t have paint added to the surface, I’m not worried about what might be flaking off into our food like I would it they’d been painted.

I suppose you could do an entire canister set this way. Either with all the canisters being one size or by buying various sizes of coffee to get different heights for your canisters.
You could have one for flour, one for sugar, and one for tea. You could make additional canisters for rice or beans. Whatever you like to store.
And the red and black colors of these Folger’s cans look nice on the countertop. So let your imagination run wild!
~TxH~
This post categorized in 
Tagged in ![]()
![]()
![]()
![]()
![]()
Coffee Canister Repurpose Ideas:
Kitchen Repurposes
- Making A Cute Country Bread Box
- How To Make A Flour Canister
- Storing Bulk Items In The Pantry
- Replaceable Food Storage Dishes
Garden Repurposes
- Using Repurposed Canisters For Garden Weeds
- Repurposed Coffee Canister To Cute Inexpensive Planter
- Coffee Canisters Into EcoBricks For The Garden
- Empty Coffee Can Repurposed For Grape Harvest
- Repurposing A Coffee Can For Deep-Soak Watering
Other Repurposes
More Repurposed Coffee Canister Ideas

C’mon by & sit a spell! Come hang out at our Facebook Page. It’s like sitting in a front porch rocker with a glass of cold iced tea – lots of good folks sharing! You can also follow along on Pinterest, Twitter or Instagram.
If you’d like to receive an email each time a new blog post goes live it’s EASY to
Subscribe to our blog!
I usually buy bagged coffee, but this is a cute repurpose. I live in the tropics and occasionally have tiny ants or roaches. Do the lids seal tight enough to protect the contents?
The coffee canister lids I use are pretty air-tight so I’d assume they’d also be insect proof with the exception of super-tiny insects. (and probably those too!) ~TxH~
Thanks for the instruction … tried and and way too labor intensive IMHO. I was the comment about floor stripper but wondered if it would damage the container (some sort of plastic). I was cleaning out some old paint and realized I had a container of Citris-Strip … non toxic, waterbased, just an “orangey” smell, didn’t need gloves … super easy. I thinned it a little since I wanted to make sure it didn’t damage the container. Brush it on, wait about an hour. Used an old, dry towel (tried a damp towel but didn’t work as well) and it came right off. VOILA … Might have taken less time if I hadn’t thinned the stripper but it was my first try.
You’re certainly right Susan. I too was surprised at how labor intensive it was to remove that dang print. Those coffee advertising guys sure make it tough. Thanks for sharing your tips! ~TxH~
To remove the labels, peel as much of the paper label off or as you did, scrape it off and then use equal parts coconut oil and baking soda to make a paste and put on label area and leave sit for few minutes or more depending on how much of label is still there. Use a soft scrubber and scrub the area to see how much of it can be removed. Then wash as normal. If it’s a more stuck on label try the paste again. Chemical free sticky remover!
Thank you for the tip on removing sticky residue beneath paper labels. It’s very effective & I use this tip often, although I use whatever cheap oil I have (not necessarily coconut oil). The baking soda gives it a little more scrubbability and it does a great job as you’ve said. But these coffee cans don’t have paper labels. The ‘print’ is actually printed directly onto the plastic can and they’ve covered the print with a clear coating to keep it from being removed easily. It’s tricky to remove the print from these coffee cans that’s for sure! ~TxH~
I, too, had this problem of trying to remove labels. Then, one day I was stripping my kitchen floor using Ace Hardware’s Professional Floor Stripper. It comes in a one-gallon jug. The stripper was instantly taking off several layers of wax. The next day, I thought about how quickly it worked on the floor and wondered what it would do on one of the many Coffeemate Creamer canisters that were collecting. BINGO! That was the answer. Using the rough side of a Scotch-Brite scrub sponge and a little floor stripper, that stubborn printed label came right off. It took about two minutes to remove the label from each canister. No need to scrip the clear coating, first. It comes right off with the stripper, too.
I use these to ferment chicken feed. They work great!! Thanks for the additional ideas…
That’s a great repurpose idea Annemarie. Thanks for the tip. ~TxH~
Question how do u get smell out of canisters
After the coffee canister is empty I wash it with soap, baking soda & water. I often follow up with washing it in the dishwasher too. If coffee smell remains I’ll set the canister in strong sunshine for a few days. Typically that does it. If not, the smell is very faint and doesn’t affect the taste of anything stored in it. The coffee scent disappears completely over time. ~TxH~
The easiest and cleanest way to get glued labels off #2 plastic is to fill the container with 200-degree water, wait ten seconds or so, and peel them off. (#2 melts at not much more than that, so use a thermometre to measure the temperature of the water. Also, you’ll probably need gloves, a dishtowel, or an oven mitt to handle the filled bottle.)
This works on vinyl labels too, such as those often found on detergent bottles. You may need a knife to scrape up a corner first, but then the label pulls right off.
Paper and plastic film labels will leave a layer of sticky glue, but you just pour out the water and scrub the gum off with paint thinner and a rag. Again, it comes right off.
I use the hot-water method for pulling actual labels off containers too, but instead of paint thinner I usually use WD-40 oil (just because that’s what we have) and it works well for removing sticky residue too. But dang when the print is actually ON the canister instead of a removable label it’s quite the frustration. So glad I discovered the secret that works well for us. ~TxH~
I am wondering if the Maxwell House canninsters can be cleaned the same way…?
I dunno Evelyn, but you can follow the same steps & see. I don’t know why not! Come let us know how it works – inquiring minds want to know. 🙂 ~TxH~
This looks like a great job for my kids to tackle. These canisters do make handy storage units! Thanks for sharing your tips and tricks with us.
(Stopping by today from This Is How We Roll)
This would be perfect to store beans or rice.
Yes, I agree Charlene. I’ll be sharing some of the ways I’ve been able to use these for cute or vintage-inspired food containers soon, so be watching the blog! ~TxH~
I’ve only used them to store my kitchen scraps until it’s time to feed the worms . I will see what other fun uses you have posted in the past. I am a newbie here and love your posts. Thank You! 🙂
Sylvia, I’m so glad you’re here and I hope you stick around awhile!! I’ve had fun coming up with various uses and they’re all super simple. ~TxH~
I like to use Blue Bunny ice cream containers for use in our rv. I think their labeling is similar. I am going to give your technique a try and see if it works. Worse case scenerio I wreck the container and have to buy another (oh the sacrifices we must make lol!!). Thanks for the tip!
You have more patience than I. I gave up on trying to get them stubborn labels off, so using scrapbook paper I covered up the labels with my pretty scrap book paper as well as regular wrapping paper; holiday papers as well. Yes, some I have painted (covering the label) for storing non-food items unless it’s a container of homemade cookies to give to family and friends.
Goo-Gone is Good stuff
I’ve covered the writing with pretty paper in the past Colleen, and the results were beautiful. But these canisters are gonna see some heavy use. I really wanted them as clear as possible of anything that could become chipped, soiled or tattered. But I was surprised about that clear layer on top of the print. Removing that was the secret to success. I’ve since cleaned off the print to another couple of canisters to get my project going. ~TxH~