
by Texas Homesteader ~
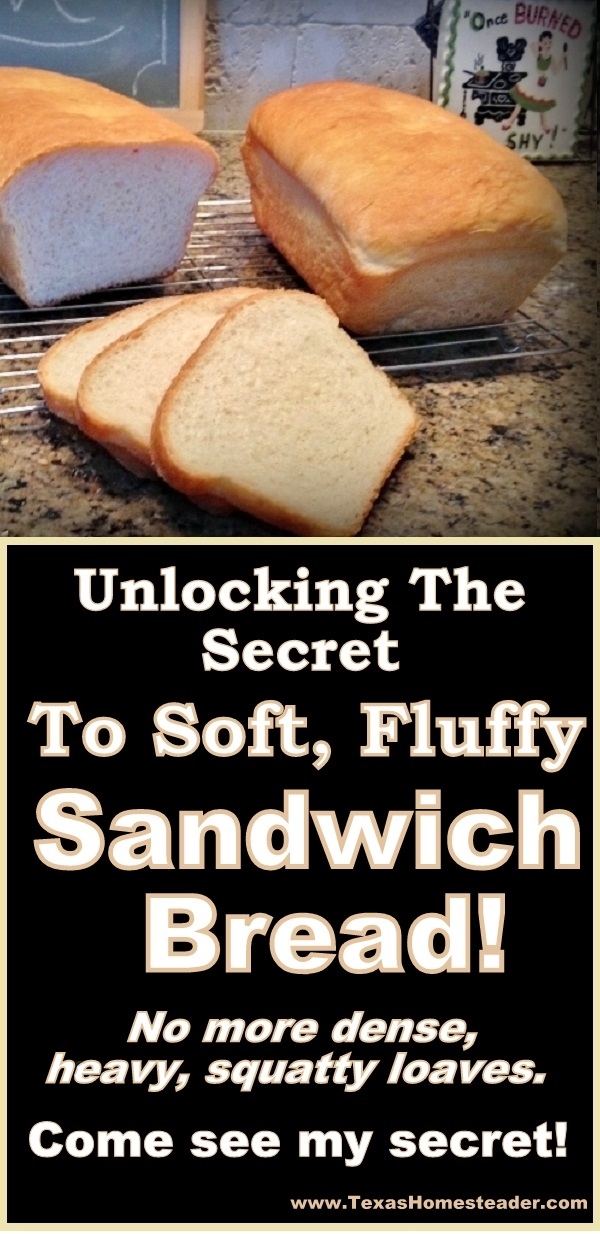
FINALLY a soft, flavorful sandwich bread recipe! My KitchenAid speeds the kneading time significantly & the results? Light, fluffy, DELICIOUS!
(Note: Some links in this post will take you to other related articles for further information. But links preceded with * are affiliate links. If you click and buy something I could receive a tiny commission.)
Failing At Making Homemade Bread
I’ve read the recipes and they all talked about how easy it is, but bread had always been a challenge for me no matter how hard I try. And I’d tried for years.
I always end up with a short, squatty, heavy-textured loaf. RancherMan has never complained but I longed to make him REAL sandwich bread. You know the kind: soft, fluffy and aromatic.
I’m stubbor… I mean PERSISTENT so I kept trying over the years and I’m happy to say at last it appears the stars and the moon have finally aligned.
Cue the celebratory choirs – I’ve finally been successful in making the perfect homemade sandwich bread!
Learn From My Bread-Making Failures
-
Don’t Add Too Much Flour
In trying to obtain a smooth non-sticky texture with dough I’d always added too much flour.
Using my * KitchenAid Mixer was a major reason my bread-baking session finally resulted in success.
Since I’m not kneading with my hands I’m not quite so apt to start adding flour to keep from having dough-gummed hands reminiscent of a toddler making a mud pie.

-
Never Scoop Your Flour To Measure
You should never scoop flour when measuring. Instead spoon the flour into a measuring cup and then level it off with the flat edge of a butter knife.
By scooping the flour up with a measuring cup the flour will be compacted, resulting in too much flour being measured.
Hummm… No wonder my loaves were too dense and squatty before…
KitchenAid Sandwich Bread Recipe For Success!
So with renewed excitement I’m ready to try again. I love the ease of using my * KitchenAid so I looked up the recipe that came with my mixer.
But y’all already KNOW I can’t stand to follow a recipe exactly. So I tweaked the recipe to suit our tastes:
Big Recipe Improvements: I replaced 1/3 of the butter in the recipe with bacon grease for extra flavor.
I’m not sorry & I’m here to tell ya that you should totally make the substitution too!
KitchenAid Sandwich Bread Ingredients
The ingredients I use for my KitchenAid sandwich bread are simple:
5-6 cups flour
3 Tablespoons sugar
2 teaspoons salt
3 Tablespoons butter/bacon grease
4½ teaspoons active dry yeast
½ cup milk
1½ cups warm water
See? Simple ingredients for a wholesome loaf of homemade bread.
Huge Shortcut: Weighing Instead Of Measuring Flour
Measuring the flour takes lots of time when there’s several cups of flour for making bread. Now I measure the flour once and make note of the weight. Then subsequent batches of bread have dry ingredients WEIGHED instead.
I have a kitchen scale that includes the tare function to zero out the weight of the container sitting on it. This is now one of my most valuable tools in bread-making shortcuts!
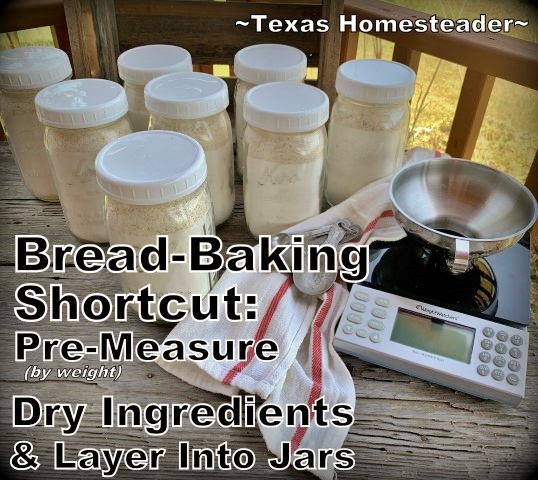
I’ve heard that the weight of your flour could vary based on type, and even the humidity in your area. So although this is probably only an estimate, here’s a link from King Arthur Flour that gives estimated weights of a cup of different flours.
Making My Fluffy Sandwich Bread
I measured the milk and heated it in the microwave for about 30 seconds or so until it was very warm.
Then I added the butter, bacon grease, sugar and salt and stirred until the butter was melted. I sat it aside so it could cool to lukewarm.
In a large measuring cup I measured out & warmed the water. Then I stirred in the yeast until it was dissolved.
I poured the water/yeast mixture into my KitchenAid bowl and added the lukewarm milk mixture and most of the flour.
Using a dough hook in my KitchenAid mixer on speed 2 for about a minute to get it all incorporated.
After a minute I added a bit more flour and continued mixing on speed 2 for about two minutes. (I’m looking for the dough to cling to the hook and clean the sides of the bowl)
When all is ready I pull out a stainless steel bowl and grease it well. I plop my dough into the greased bowl turning the dough ball to coat all sides of the dough.
Then I greased a piece of wax paper and placed it across the top of the bowl, greased side down.
First Dough Rise
To warm the oven I turn it on preheat for about 30-45 seconds, then turn it off again. This makes a warm draft-free environment for my bread to rise.
With the oven turned off I slide my bowl containing my bread dough into the oven and shut the door. Finally I set the timer for 1 hour and let the dough do its magic.
After an hour the bread has risen beautifully. I lightly flour my counter top and plop the whole thing on the counter.
After kneading for a couple of minutes I cut the dough in half, sprinkle a little flour on one half of the dough and roll the dough into a rectangle.
 Then I carefully roll the rectangle dough into a log, pinching the ends to seal them. I place the dough log into a greased glass bread pan, turning to coat the top.
Then I repeat the rolling/pinching/greasing procedure for the second loaf.
When both loaf pans are ready I place them back in my warm oven, cover them with the same wax paper as before and allow the dough to rise a second time.
I allow a second rise for about 50 minutes. You want your dough to rise to approximately double in size.
Ready To Bake The Bread!
When the bread is ready to bake I carefully remove the wax paper, turn the oven to 375ºF and set my timer to 30 minutes.
About 5 minutes before the baking time ends I rub the tops of my loaves with a little butter to soften the crust, then allow them to finish baking.
When the timer goes off I remove the bread from the oven & place a clean kitchen towel over the bread while still in the pans for 5 minutes – I feel this further softens my crust.
Then I remove my loaves from the pans and place them on a baker’s rack and allow them to cool. I re-cover the loaves as they’re cooling with a kitchen towel to keep the crust soft.

It looks great, it smells great – but how does it taste?? I sliced a big honkin’ piece and gave it to my RancherMan to sample.
He says I nailed it. Finally, SUCCESS! I’m practicing my acceptance speech, “I’d like to thank my KitchenAid for making this possible…” LOL (No KitchenAid didn’t pay me a cent to say that nor to write this post, but today’s bread was certainly made possible by it. I “heart” my KitchenAid!)
Other Favorite Bread Recipes
I now bake bread all the time. There’s a complete list of our favorite bread recipes below. Be sure to check them out.
And since I bake bread so often I’ve also created a series of Bread-Baking Shortcuts so I don’t have to start from scratch each & every time. Work smarter, not harder right??!!
So now that you’ve read the behind-the-scenes story, here’s the recipe:
Did you make this homemade bread? Please rate the recipe in your comment below!
KitchenAid Sandwich Bread, Yields 2 loaves
Ingredients
- 1/2 cup milk
- 3 Tablespoons sugar
- 2 teaspoons salt
- 3 Tablespoons butter (can substitute 1 Tablespoon with bacon grease for better flavor)
- 4.5 teaspoons active dry yeast (or 2 pkgs)
- 1.5 cups warm water (105 - 115 degrees)
- 5-6 cups flour, using the blend below:
(2.5 cups whole wheat flour, 2.5 to 3.5 cups all-purpose flour)
Instructions
Directions:
-
Heat milk, sugar, salt & butter until butter melts and sugar dissolves. Cool to lukewarm.
-
Dissolve yeast in warm water, pour into * KitchenAid bowl and add lukewarm milk mixture and 4.5 cups of flour. Attach dough hook and mix on Speed 2 for about one minute or until all ingredients are incorporated.
-
Continuing on speed 2 add remaining flour as needed, 1/2 cup at a time (depending on our humidity I usually need to add 1/2 cup to the 4.5 cups I started with) and mix until dough clings to hook - about 2 minutes. Continue kneading on Speed 2 for about two minutes longer or until dough is smooth and elastic. Dough will be slightly sticky.
-
Place dough in a greased bowl, turning to grease top. Cover and let rise in a warm place free from drafts until doubled in bulk, about 1 hour.
-
Punch dough down and knead by hand on a floured surface for about two minutes. Divide in half and roll each half into a rectangle with a rolling pin. Then by hand roll each rectangle into a log, pinching the ends to seal, and place each log into a greased 9x5x2 loaf pan, turning to coat the top.
-
Cover & let rise in warm draft-free location until doubled in size, approximately 50 minutes. Remove cover and turn oven to 400 degrees (375 for glass pan) and bake for 30 minutes. When only 5 minutes remains brush melted butter on top of each loaf and allow to finish baking.
Recipe Notes
When bread is done, I like to cool the bread for the first 5 minutes while it's still in the pan, covered with kitchen towel before removing the bread from the pans & placing on wire racks & recovering with the kitchen towel to cool completely. Once bread is completely cooled you can slice it and store it for use. (or do as we do & cut a chunk while it's still hot, slather with butter & ENJOY! LOL)
~TxH~
Other Favorite Breads
Sandwich Bread Recipes
No-Knead Bread Recipes
Flavored Bread Recipes
Recipes For Buns
Biscuit Recipes
- Homemade Country-Style Buttermilk Biscuits
- Mix-n-Bake Cheddar Biscuits
- Snappy Jalapeno/Cheese Biscuits
Cornbread Recipes
Tortilla Recipes
Sweet Breads / Desserts
- Leftover Biscuit Dough Cinnamon Rolls!
- Cantaloupe Bread w/Pecan Praline Glaze
- Chunky Apple Bread With Honey Glaze
- Sweet Pumpkin Bread
Bread Tips
- Making Pre-Mix Bread Ingredient Packets
- Making My Own Oat Flour For CHEAP
- My Favorite Bread-Making Kitchen Feature
- Homemade Bread-Making Shortcuts, Tips & Tricks
- Make Self-Rising Flour From All-Purpose Flour
- Our Favorite Bread Recipes, All In One Post
All Bread Posts

C’mon by & sit a spell! Come hang out at our Facebook Page. It’s like sitting in a front porch rocker with a glass of cold iced tea – lots of good folks sharing! You can also follow along on Pinterest, on Twitter or on Instagram.
If you’d like to receive an email each time a new blog post goes live it’s EASY to Subscribe to our blog!
Has anyone adjusted the ingredients and made this in their breadmachine?? (2 lb loaf)
I’ve amended it, replaced the more expensive whole-wheat flour with homemade oat flour (made from regular whole oats) and calculated it up for a 2-lb bread machine loaf. I make this bread 2-3 times a week, it’s RancherMan’s favorite. –> https://texashomesteader.com/bread-machine-recipe-2-lb-oatmeal-bread/
In your “story” you say to turn the oven to 350, but in the recipe it says 400. Which one? Also, do I remove the raised loaves and then preheat the oven or leave the loaves in while it’s preheating? If the latter, do o start the timer before it reaches temp or after?
The general temp for this bread is 400 degrees F, but the baking rule of thumb is to lower baking temps 25 degrees if you’re using glass. My pans are all glass, so I bake mine at 375. So 400 degrees if you’re baking in a metal pan, 375 for a glass pan. I don’t see a 350 degree reference anywhere in this post, but I’ll scan for it because that would obviously be a typo somewhere. (oops! It happens. LOL) Also I don’t remove my bread from the oven while it’s preheating. The timer starts when I turn the oven on. I’ve always been wary of how careful you would have to be to bring out bread that’s risen as to not deflate it. So I leave it in the oven when I turn it on and it works great. I’m very pleased with the light, fluffy loaf this recipe makes. And so is RancherMan! ~TxH~
It’s in the OVEN!!!! I can’t wait for it to come out. Looks beautiful.
YEA Judith! This is our favorite bread, I know you’re gonna love it too. I’ve been replacing some of the whole wheat with ground oatmeal lately (to use up an excess that I have in our pantry) and we love that too. Bon Appetit! ~TxH~
I have never been brave enough to attempt homemade bread! But I do own a KitchenAid Stand mixer, so maybe I should give it a shot! Thanks for sharing!
It’s hard to fins a homemade recipe that’s soft, yet holds together when sliced thin. I’m definitely going to give this a try. Thanks for sharing on the Homestead Blog Hop. I hope we see you again this Wednesday!
Sharing!!
I’ve been thinking of trying homemade bread….again, and here you are! I will give yours a whirl:) Thanks for sharing.
I need to try this. I have always been a homemade bread failure!
Thanks for linking up to Youre gonna love it. I am definitely pinning this for later!
This does sound like a really good bread recipe! I’ve got to give it a try 🙂 Thanks for sharing on the Simple Saturdays blog hop!
Who would have thought bacon grease would add a nice flavor. I am so going to try that the next time I make bread!
Thanks for sharing on the Our Simple Homestead Blog Hop! our-simple-homestead-blog-hop-33/
Looking forward to trying this, I’ve had the same challenges with bread and have a bread loving man! Any suggestions for high altitude adjustments? Everything cooks different up here, so not sure I need to add less fat or more flour? Altitude at 7,900 in Colorado. Thank you
I’ve lived almost my whole life in Texas so I’ve never cooked in high altitude locations Carol. Can any of you other readers offer her any advice for bread baking in higher altitudes?? ~TxH~
Also, at some point – I believe that it was on America’s Test Kitchen – I heard that measuring cups (even major brands) can be off by up to 30% of their stated volume. Make sure your measuring cups themselves are accurate; better yet, when possible, measure flour by weight instead of volume.
What is your altitude?
We’re in NE Texas, Karena. I know many things affect a bread recipe including altitude, humidity, etc. I’ve learned to use bread recipes as a base and then make the bread dough based on feel. BUT I have finally learned that the feel is much lighter and slightly stickier than I used to strive for – that’s made a huge difference in my final results. ~TxH~
Wow, getting it soft is a real struggle! Thanks for sharing that one 🙂
xx
Mila (Idea Box)
I just LOVE homemade bread! I used to make it when I was in 4-H growing up because I did a Breads project and our family loved it so much we made it all the time. I have since lost the recipe and haven’t made homemade bread for years….. I pinned to try this recipe! Thanks for linking up to #ShareTheWealthSunday
You know why I don’t make delicious homemade bread? Because I’d take the whole warm freshly baked loaf, grab a stick of butter and eat it MYSELF!!! I love freshly baked bread.
Hey, this post was VERY popular at this week’s party so you will be featured for our next Wonderful Wednesday Blog hop!
This looks great! I’m pinning it so I can give it a try later. 🙂
That bread looks really good and soft! Thank you for sharing at Thursday Favorite Things. Have a great weekend!
Thanks for the new tips on the flour. I don’t make homemade bread very often. But I do bake all the time.
I’ve made bread by hand for a long time–with no complaints at all, but I was never quite satisfied with the texture. Maybe I need to get a Kitchen-Aid! I will try your recipe and see what happens. Thanks for posting.
Dropping by from “Wonderful Wednesday Blog Hop” on ‘Recipes for our Daily Bread.’
I love the recipe. We already have the “perfect white homemade bread” for our house…but it’s not the best for sandwiches. It’s great as a “spread butter, DEVOUR on the side of a good meal”, but isn’t dense enough for sandwiches. Well, we could cut really thick slices, but you know what I mean.
I’m going to have to go give this a try! Pinned it already, even before I commented.
Jennie
ok so I had time today to try this bread. I have successfully created two brick that smell like bread.
I do know what my problems are so thats a good thing. I tried to use all white wheat flour. Read your bit about the wheat flour afterwards. And I unfortunately dropped the risen loaves on top of the stove just before putting in to bake. *sigh* so …. I will try again another day 🙂 I am sure that I can do this, I have made bread before but like you used too much flour. I just didn’t know it lol
OH NO! If I were in your shoes I’d pull the dough loaves and re-knead them and allow them to rise again before baking. They should rise and bake just fine. I’m so happy that I’ve finally been able to make a soft fluffy bread, for years and years my bread tasted fine, but was heavy, dense and squatty. I almost gave up several times but I’m so glad I persevered. This is RancherMan’s absolute favorite bread and I’m so happy to provide it for him. ~TxH~
I’ve trawled through heaps of recipes looking for a soft crust loaf and as you know this is perfect.
I used olive oil instead of butter and followed your technique for measuring the flour.
We live in a touring caravan and my husband said we couldn’t carry our KitchenAid because it weighs just under 10kgs. Needless to say it’s on the worktop.
Thanks
Man, i can cook anything, but when it comes to bread? Lousy. I will try this recipe and let you know.
Love making homemade bread! I will have to give your recipe a try! I will be featuring your post in this week’s Home and Garden Thursday,
Kathy
It does look light and airy! I too have horrible trouble with homemade bread. I bought a bread machine a little over a year ago. I love it but the texture is pretty dense. I wonder if I can adapt this to the bread machine and see how it turns out. Glad you finally found something to work for you! Thanks for sharing on Merry Monday. Pinning to experiment on later 🙂
Sounds lovely bread. I make our own most of the time and use 1/2 whole wheat flour. These look fantastic. Thanks for sharing this recipe with Good Morning Mondays. Blessings
I’ve been adding whole wheat flour little by little when making my bread dough. My hope is to get 50/50 whole wheat to white without compromising the light tender texture. So far so good. ~TXh~
I just made bread for the first time yesterday and they turned out just like your previous bread! My hubby didn’t complain, but it wasn’t as good to me. Thanks so much for sharing, can’t wait to give this a try! Visiting from A Night Owl.
OMGosh Kerby, I made that bread for years. Years. I was determined that I could do it. Give this recipe a try and remember to use a light hand with adding flour. Too much flour in the dough is where my failure always struck. My KitchenAid made it possible for me to knead the bread without adding too much flour and I’ve finally been successful. Woo-hoo! Thanks for stopping by. ~TxH~
I look forward to trying this recipe. I haven’t had the greatest success making sandwich bread. Fingers crossed. 🙂
Me too Audra. For YEARS. I was adding too much flour all these years, causing the bread to be heavy & to stubbornly refuse to rise very high. Light on the flour (and my KitchenAid mixer) has made a huge difference for me. ~TxH~
This looks so good! I’m tempted to start making my own bread because I’m never fully satisfied with the storebought kind.
I think you should go for it Emily. And hopefully this post pulls the years I’ve tried & failed off of your own attempts – you can learn from my trial & error. No more heavy barely-rising loaves, I now can finally bake up light fluffy sandwich bread. ~TxH~
I love making bread and am totally pinning this and trying it this week! I never knew that about measuring the flour. No wonder my bread often seems denser than it should. I also love my Kitchen Aid, my baking has been so much easier since I got it! Thanks for the recipe and the tips.
-Miranda at http://rahabtoriches.com/
Great tips! I haven’t made bread in awhile and we are running low.
found this on Lou Lou Girls Linky
This looks delish! I was looking on Facebook for “blogging” groups and came across one with you listed as a member and I just clicked on your name and it took me to your page and I seen THIS . So glad I did. definitely have to try this recipe out and thank for sharing it with us.
One thing to remember is; have everything at room temperature. I buy bags of flour when it’s on sale and store in the freezer so I have to remember to get it out a day or 2 ahead of time. But your milk, egg etc. should be at room temperature before using. Same goes for my cake mixes that I buy on sale; I store in the freezer and get to room temperature before using.
Oh, how I remember my first time making homemade bread, was shortly after I got married,with sad results I must say. I would either get the water too hot and kill the yeast or water wasn’t hot enough for the yeast to do any good. It was so bad that the dog wouldn’t even eat it. It just turned up his nose and walked away.
Over the years I finally had master the art of bread making. I make a lot of whole wheat and rye bread and every once in awhile; homemade dinner rolls.
My mom Always made homemade bread. I don’t recall my parents ever buying a loaf of store bought.
Thanks for sharing your recipe. Will have to give that a try using bacon grease.( I save all my bacon grease; putting in container and freezing it for frying potatoes, eggs, etc.)
We haven’t had bacon for years Colleen but my parents save their bacon grease for us. I use it sparingly since it’s grease and all, but a small amount in green beans is delicious and of course now I’m using it in this bread as well. I tried substituting all the butter in the recipe for bacon grease but my bread’s crust was a little crustier than I wanted it to be & I was afraid it was because of the amount of grease. Now I substitute 1 of the tablespoons of butter for bacon grease and I love it that way. I want to experiment with substituting another tablespoon of butter with bacon grease but RancherMan says I’m NOT to play with this recipe anymore – it’s perfect! LOL ~TxH~
The only way I can make good bread is by mixing the dough in my breadmaker machine. Then I shape it and put it in a bread pan and bake it in the oven. Turns out good that way. I will not bake it in the breadmaker, hate the way it turns out. Glad you had success, there is nothing like fresh home made bread.
I never liked the way bread baked in a breadmaker turned out either Terry. I’ve heard others talk about the ease of using the breadmaker for the mixing/rising and setting the dough in a loaf pan to bake in the oven. Sure wish I’d thought of that years ago when I got rid of my breadmaker. (yeah, sometimes my thought process can be a little slow…) ~TxH~
Fantastic! I’m so dang happy for you with the success of your bread.
Thank you SO MUCH for your post and pictures. I really appreciate how you explained the process to the “T” for dummies like me. Now, finally, I feel some sense of understanding of how bread is actually made. I’m a visual-type and your post (along with your bread) ”’nailed”’ it for me. I’ll be trying this recipe soon. It will be my very first attempt at making my own bread. I hope I have success like you did.
You have no idea how much you inspire and encourage me. I truly appreciate all the time and energy you put into your posts.
Enjoy your bread ~ Bobbie
Thanks Bobbie, for your sweet comment. If it’s your first time to make bread here are some things to watch for – make sure no liquid goes into your yeast if it’s too hot since heat will kill your yeast. You want a nice warm 100 – 115 degree environment to keep it active but no warmer. Also try not to overload your dough with flour, that’s always been my trouble and the reason I was never successful with my own homemade bread in the past. Allowing the bread to rise in a warm draft-free environment until double is good but as I mentioned allowing it to over-rise will create large air pockets that will collapse during baking. The bread will still taste good but will have holes all through it. And lastly, don’t try to reduce the salt, it’s pretty necessary for a tasty loaf. (yep, I’ve made that error too) Good luck! ~TxH~
Thanks for sharing this. I’ve been looking forward to this recipe
Give it a try Sandy, I’m pretty excited about the recipe’s success and have been making bread almost daily for a few days so I can get a stockpile of fresh homemade loaves in my freezer. ~TxH~
I know you have been playing with this recipe. You’ve been teasing us with your pictures and stories on Facebook. I will be trying this. Mine will have to be made with butter. I have no bacon grease. I’ll save some next time I cook up some bacon.
I made this and it is very good for a sandwich loaf and does stay very soft. It is very easy to slice, Thanks for the recipe : )