
by Texas Homesteader ~
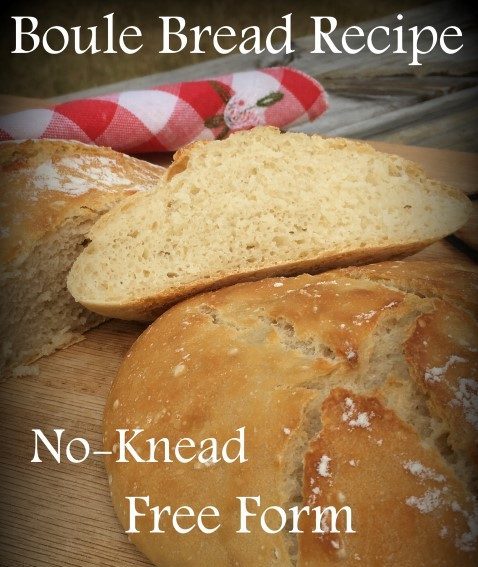
Looking for a no-knead free-form bread? Enter this homemade boule bread. The crust is nice & soft thanks to a cup of water tossed into a flat pan on the bottom rack to create steam in the oven as it bakes. Check it out.
Jump to Recipe
Looking For A Bread Recipe
I’d been asked to bake a loaf of bread for our World Communion Sunday. They wanted to display different breads from different cultures. So I decided to make Boule, a french free-form bread resembling a squashed ball.
I’ve never made it before but the first recipe I tried was a flop. The bread never rose much and it was SO SALTY! WHEW.
So I asked my beloved Facebook Followers and Cheryl came through for me by pointing me to King Arthur Flour site. The bread baked up beautifully and the texture was delightfully chewy.
The ingredients in that recipe seemed very straightforward – All-purpose flour, yeast, salt and water. But I added a teaspoon of sugar to feed/proof the yeast before mixing it all up. next time I’ll probably add an additional teaspoon.
Proofing The Yeast
I measured and heated the water to just lukewarm – about 100 degrees. Not too hot now, you don’t want to kill your yeast!
Then I added the measured yeast and a teaspoon of sugar and gave it all a stir. Proofing the yeast just assures that your yeast is still active.
It’s such a bummer to go through the bread-making process only to have all your efforts wasted because the yeast is no longer active! While the yeast was proofing I gathered and mixed the other ingredients.
Properly Measuring Flour For Bread
I pulled out my KitchenAid mixer and the paddle bit and measured the flour into the bowl.
Now remember, when making bread it’s very important that you don’t just scoop your measuring cup into the flour. Doing this will almost certainly assure your flour measure is compacted. You’ll measure too much flour and your bread will be heavy.
The standard procedure for measuring flour for bread is to spoon the flour into a measuring cup until it overflows, then use the straight edge of a knife to scrape the excess flour back into its container.
Keep Track Of Your Measured Flour
And here’s another tip for ya. Did you ever lose count of how many cups you’ve measured so far? Maybe the phone rings, maybe the kids come in to ask a question, maybe Martians come strolling through your house carrying a lazer gun.
Whatever it is, distractions happen!
So when I’m measuring my flour I use this Homestead Hack. My grandmother’s buttons help me keep track of my progress. I haven’t mis-measured flour once since using this method!
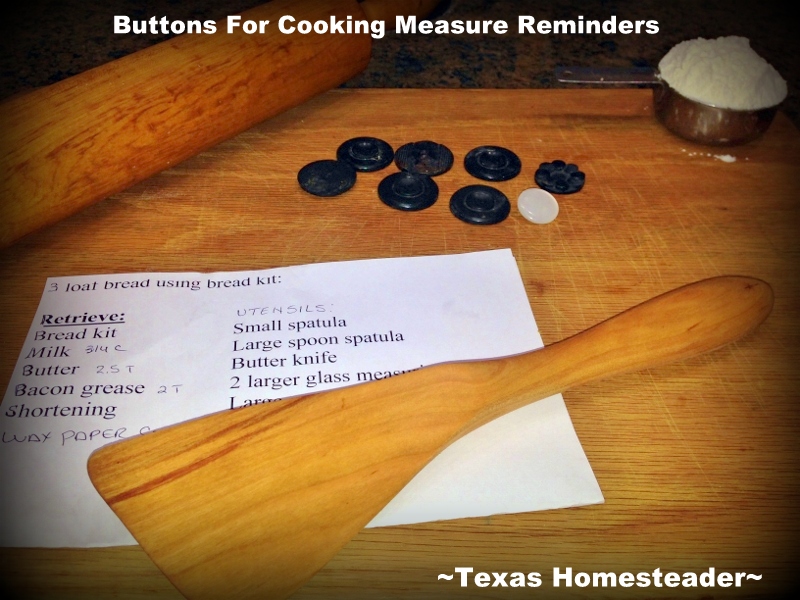
Anyway I measure the flour and dump it into my KitchenAid stand mixer bowl. Then I add the measured salt and insert the paddle bit and give it all a quick stir.
Mixing The Bread Dough
By now my yeast is showing delightful activity. So I use a spatula to scrape out every last drop into the flour mixture.
Now I turn my KitchenAid on to speed 2 and mix it all for about only about 30-60 seconds. You don’t want to over mix, just get everything blended.
And you don’t even need a stand mixer for this bread. A large bowl & heavy wooden spoon will do the trick quite nicely too!
First Rise
Now it’s time to allow the bread to rise. I have a very large 8-qt Tupperware bowl so I brought it out & plunked the whole sticky mess into it.
You’ll want something large enough to give the dough room to rise. I placed the lid on top but didn’t snap it down. The dough will rise and fall and I don’t want an airtight seal to keep the dough from doing it’s thing.
After about 2 hours on my counter top the bread has risen and then fallen ever so slightly. That’s perfect!
Now I slide this bowl of bread dough into the refrigerator with the lid covering the bowl. But the lid is still not snapped down tight.
I’ll need to keep this bread in the refrigerator for at least 2 hours before making my bread. But I’ve got errands and chores so it will have to wait until tomorrow.
No worries – I can let it hang out in the refrigerator for up to 7 days. The bread’s flavor intensifies as it sits chillin’ in the fridge.
If I keep it in there for the full 7 days it will be nice & tangy like sourdough!
Forming the Loaves
The next day I bring out my bowl-o-dough. I sprinkle a little flour over a section of the dough and a little more flour on my counter top. Then I grease my hands and grease a baking sheet.
Using my greased hands I pinch off about a softball-sized chunk of sticky dough and plunk it onto the flour-covered counter.
You don’t want to knead this dough, just shape it.
So I quickly shape the loaf into a ball by stretching the top & tucking it beneath the dough. I don’t worry too much about perfection, I just want it round-ish.
Then I quickly scoop it from the counter top & plunk it on one edge of my baking sheet. I figure since my oven will be on I might as well cook 2 loaves at the same time.
So I repeat this step and plunk another hunk of rounded dough on the other side of my greased baking sheet. Then I sprinkled a light coat of flour over the dough balls. This keeps them from drying out while they’re rising.
2nd Rise & Oven Prep
Since the dough has just come out of the fridge it will need to warm & rise for a bit first. So I turned the light on in my oven and slid the baking sheet in, setting my timer for 45 minutes. That light will give some gentle warmth to help the dough do its thing.
When the timer went off I was somewhat dismayed to see the bread dough really didn’t puff up much. It was just a flat-ish lump!
But the recipe promised it would rise more in the hot oven. So I carefully removed my banking sheet from the oven to finish it’s last 15 minutes rise time on the counter.
Then I made sure I had two oven racks in – one in the middle, one near the bottom. I put a flat metal pan on the bottom rack & turned the oven to 450 degrees to preheat.
Baking The Bread
When the final 15 minutes of rise time on the counter was up the oven had preheated quite nicely. I measured a cup of water and sat it aside. Then I made a few slashes on top of each loaf and carefully slid it into the oven.
Finally I poured that cup of water on the heated flat metal pan on the lower rack. The water sputtered as it was supposed to do and I quickly closed the oven door.
I sat the timer to 25 minutes and held my breath, hoping this bread would be successful. As it was baking I was pleased to see it was indeed rising beautifully.
When the bread was done I pulled it from the oven and sat the loaves on a metal rack to cool. As I always do when I’m baking bread, I covered the loaves with a clean kitchen towel to keep the crust softer.
Nothing Beats The Smell Of Homemade Bread
But RancherMan knows I’ve baked one loaf for church and one just for him. He’s been hovering around like a bumblebee waiting for the invitation.
So I cut a couple of chunks of bread and we took a taste.
I’m pretty pleased with the look, texture and taste of this bread. It’s firm, chewy and delicious. Instead of slicing, we prefer to rip off hunks to enjoy with our meal.
Although I’m often baking up RancherMan’s Fluffy Sandwich Bread too, this Boule recipe will be placed in tight rotation from now on at our Homestead. Hat tip to Cheryl for sending me to a good recipe over at King Arthur Flour’s site!
There are still two loaves worth of dough in the refrigerator so I’ll be baking them up soon. I fully expect to play with this recipe some.
Perhaps making it herb flavor by adding minced fresh rosemary or basil? What a great thing to bring to a covered-dish gathering! And since it’s this easy to make, why not??
NOTE: Although we love this bread, the addition of the water in a pan to make steam during baking has caused condensation to form & run between the glasses of my oven door. It’s virtually impossible to clean!
So I’m often making another free-form bread that doesn’t required that step. If this is a problem for you too, check out my Rosemary Skillet Bread Recipe. No hot pan of water during baking is required!
Otherwise if your oven’s not as crappy as mine apparently is, here’s the recipe for my Boule bread:
Boule - Free-form No-Knead Bread Recipe
This no-knead bread bakes up delightfully dense & chewy without being hard or dry. Mix, rise, form and bake. It doesn't get easier than that!
Ingredients
Ingredients
- 3 Cups lukewarm water (100 - 105 degrees F)
- 6 1/2 to 7 1/2 Cups All-Purpose Flour
- 1 Tablespoon salt
- 1 1/2 Tablespoons instant or active dry yeast
- 1 Tablespoon Sugar
Instructions
Directions
-
Proof the yeast by combining warmed water, sugar & yeast. In the meantime measure & combine flour & salt in a large 5-7 quart bowl.
-
When yeast begins to bubble, add it to the flour mixture. Turn KitchenAid on speed 2 and mix just until combined - about 60 seconds. This step can be accomplished with a sturdy wooden spoon instead if desired. (note, the dough will be rough & sticky)
-
Cover bowl & let dough rise at room temperature for about 2 hours. Then refrigerate the covered dough for up to 7 days (but at least 2 hours). The longer you keep the dough chilled, the more tangy it becomes.
If you're using a cover on your bowl you'll want to keep one corner open to allow pressure to escape.
To Bake Bread
-
To bake the bread, pull the covered bowl from the refrigerator. Sprinkle a section of the dough with flour to make it easier to pull away. Flour your countertop as well. Then bring out a baking sheet and grease it lightly. Also grease your hands.
Pull a section of dough from the bowl about the size of a softball and place it on your floured counter top.
-
Shape the dough by stretching the top & tucking it beneath the dough ball. The ball will be rustically shaped, don't strive for perfection with this step.
-
When the dough ball is round-ish, put it on the greased baking sheet and sift a light coating of flour over the surface of the dough. This will keep the dough from drying out during its rise time.
-
Place the dough into a cold oven with the light turned on for gentle warming to allow it to rise
After about 45 minutes, remove the dough from the oven. Make sure one oven rack is in the center of the oven and one oven rack is at the bottom. Place a shallow metal pan on the bottom rack and preheat the oven to 450°F
NOTE: Use a metal pan not glass as the procedure to follow could crack glass or Pyrex pans
-
When the final 15 minutes rise time is finished & the oven has preheated, slash the bread top 3 times.
-
Place the bread onto the middle rack of the preheated oven. Then pour 1 cup water into the shallow pan on the bottom rack When the water hits that hot pan it'll sputter but that's what you want it to do. Now just close the oven door & set your timer to check your bread in 25 minutes.
-
Allow the bread to bake for about 25 minutes, or until it's golden brown.
-
Remove the bread from the oven and place it on a baker's rack to cool. Cover the cooling bread with a clean kitchen towel to help keep the crust softer.
Recipe Notes
Modified from the recipe on King Arthur Flour site: No-Knead Crusty White Bread Recipe
~TxH~
Other Favorite Breads
- Soft Sandwich Bread
- Oatmeal Sandwich Bread
- Making Pre-Mix Bread Ingredient Packets
- Bread Machine Recipe: Honey Oatmeal Bread
- Making My Own Oat Flour For CHEAP
- No-Knead Rosemary Skillet Bread
- No-Knead Boule Bread
- Jalapeno/cheese Yeast Bread
- Easiest Honey/Oat Hamburger Buns
- Jalapeno/Cheese/Beer Hamburger Buns
- Basic Beer Bread
- Rosemary/Cheddar Beer Bread
- Pesto Beer Bread
- Homemade Country-Style Buttermilk Biscuits
- Mix-n-Bake Cheddar Biscuits
- Leftover Biscuit Dough Cinnamon Rolls!
- Snappy Jalapeno/Cheese Biscuits
- Jalapeno Cornbread
- Corn Dodgers – A Delicious Accident
- Mix-n-Pour Tortillas
- Easy Corn Tortillas
- Sweet Pumpkin Bread
- Cantaloupe Bread w/Pecan Praline Glaze
- My Favorite Bread-Making Kitchen Feature
- Homemade Bread-Making Shortcuts, Tips & Tricks
- Make Self-Rising Flour From All-Purpose Flour
- Our Favorite Bread Recipes, All In One Post
All Bread Posts

C’mon by & sit a spell! Come hang out at our Facebook Page . It’s like sitting in a front porch rocker with a glass of cold iced tea. There are lots of good folks sharing! And you can also follow along on Pinterest, Instagram & Twitter
If you’d like to receive an email when a new blog post goes live,
subscribe to our Blog!
I need to dig out my cheddar cheese braid bread; something I haven’t made for a few years. I would use sharp shredded cheddar cheese and I think at one time I used dried dill weed in with and then the bread was made in a braid and baked on baking sheet. Time for me to dig out that recipe and dust it off and make up a couple loaves. (now, if I can just remember where I put that recipe.)
Pinned :}
Thanks for sharing this recipe. I know I’ve never had a bad experience getting a recipe off the King Arthur site. That bread does look yummy! I’ll bet this bread goes over really well at church too.
I appreciate all the recipes & DIY ideas you offer up on your blog, thanks.
Hope your Sunday is a great one.
Debra Gordon
Such a sweet comment Debra – thank you!! The bread was a perfect addition to our church service and as I said, it’s now become a favorite at the Taylor Homestead. I told RancherMan the next time I make this bread (which will be soon) that I’ll make an herbed version with minced fresh rosemary and maybe some sharp cheddar. He seemed enthusiastic to try that, and also requested a jalapeno/cheddar version. Looks like we have a winner with this recipe! ~TxH~
That looks so Goooooood; warm bread with a bit of honey on top. Nothing better than the smell of fresh homemade bread going through the house.