
by Texas Homesteader ~
Gardening is a rewarding hobby, but it can also become costly. In this post we’ll explore practical DIY solutions & budget-friendly techniques tips to help save money in your vegetable garden.

(Note: Some links in this post will take you to other related articles for further information. But links preceded with * are affiliate links. If you click and buy something I could receive a tiny commission.)
It’s easy spend too much money in the garden. The slick advertising moguls often convince us to buy things that might improve various growing conditions in our garden – garden stakes, ties, plant markers, mulch to preserve moisture for your plants, etc.
But can you actually get those improvements without spending money for it in the stores?
Benefits of Growing A Vegetable Garden
Y’all know I love my veggie garden. There’s just something about grabbing that wicker gardening basket on my way out the door and strolling out to my gated garden.
I spend lots of time in my garden just harvesting fresh veggies while enjoying the sunshine and singing birds, the butterflies and the beauty of the garden itself.

But you know I’m a fan of #UseWhatchaGot. And I love saving money too.
While continually improving growing conditions in the garden is a good thing, do you really need to BUY something for it?
Or can you save money by repurposing things to fill those needs?

By thinking outside the box & repurposing what you have you can get many garden helpers for FREE.
Protecting Tender Seedlings From The Wind
To protect tender seedlings I push the stems of small twigs into the ground around each of my young seedlings.

When the south wind blows, the twigs will keep the wind from bending the stem of the seedling. It works great. And it’s FREE.
Free Mulch For The Garden
Mulching around your plants will improve the performance in your garden by giving you healthier plants.
Various ways mulch helps keep your vegetable plants stronger is:
-
-
-
Maintain moisture for your vegetable plant
-
Keeps soil cooler
-
Reduce weed pressure
-
-

There are may ways to get free garden mulch to put around your plants:
-
-
-
Dead leaves – best if crushed
-
Newspaper – black & white print works best
-
Flattened cardboard – wet it first to make it easier to work with
-
Lawn grass clippings – be sure to allow them to dry out a bit first
-
-
All of these items will break down over the gardening season to help your soil too. And these moisture-saving solutions in the garden are FREEEEE!
Compost Can Be FREE Natural Soil Amendment!
I have several *Compost Tumblers. (and I LOVE them!)
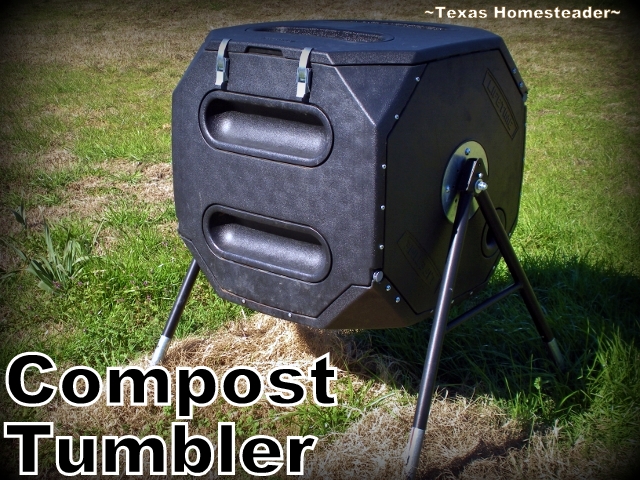
But you don’t need an actual tumbler to make compost. You can make compost in wire cages, pallet sections or just a pile on the ground!
And making soil-amending compost can be free too.
-
-
-
Food scraps
-
Seedless green weeds
-
Small plant/shrub trimmings
-
Grass clippings
-
Black & white newspaper
-
Repurposed Cardboard
-
Since we have cattle, I’m often adding Manure too!
-
-
Are you nervous about composting? Don’t worry, Compost Doesn’t Stink! Properly balanced compost simply smells like rich healthy earth.

If you’re wondering where to start, I wrote a helpful Guide On Composting.
Weed Control Using Repurposed Paper Bags
I wet down paper feed sacks, cut out a hole for my plant and laid the wet paper around my seedling.
You can cover the paper with hay or grass clippings to give it a more finished look.

Repurposed Items To Tie Plants
Cotton String – to tie blackberry vines growing along the fence in the garden. I use heavy cotton string from a bag of cattle feed.

Plastic Bag Strips – I’ve also used strips cut from plastic bags to tie my plants. Since the plastic isn’t rigid it gives a bit as the plant grows.

Plant Markers Using Rocks
To identify herbs planted in my Edible Landscape I marked the name of each herb – Basil, Sage, Oregano, Thyme, etc. – on rocks I found on our Homestead.

Where To Find Free Wood Mulch
Wood mulch is great for lining walkways and around plants. I got a huge amount of wood mulch for FREE since our county collects it for their residents.
Many people also contact tree trimming companies or utility line maintenance workers.

I used wood chips to make a nicer walking surface throughout my garden as well as to line a perimeter around my garden to stop encroachment by the grass.
Using these wood chips means that in subsequent years they’ll break down to help improve my soil every year. And once again… FREE!
Now what about your garden? How do you repurpose things around your home to keep down the cost of gardening?
~TxH~
This post categorized in 
Tagged in ![]()
![]()
![]()
![]()
My Favorite Garden Hacks

Garden Planning
- Easy Garden Planting Plan Spreadsheet
- Prepare Now! Late-Winter Garden Checklist
- How To Make Your Own Garden Soil
- Prepare Your Garden For Spring Planting
Seed Planting
- Planting Seeds In A Milk Jug Mini-Greenhouse
- Planting A Clear Tote As An Indoor Greenhouse
- Repurposed Cardboard Seed-Starting Pots
Soil Health
- Easy Compost For A Healthy Garden
- How Leaves Benefit Your Garden
- Using Manure In Your Compost & Garden
Garden Styles
- How & Why To Use Raised Beds In Your Garden
- 3-Sister’s Garden – The Original Companion Planting
- Planting A Large Galvanized Trough
- Where I Found The BEST Raised Bed!
- Planting A Blueberry Bush In Rustic Galvanized Tub
Garden Plants/Harvest
- Stevia – Growing Your Own Sweetener!
- My Simple, Zero-Waste Herb Drying Setup
- The Lazy Gardener’s Plant List – Plant Once, Eat For Years!
- How To Tell When Watermelon Is Ripe
- Luffa A Surprising Zucchini Substitute!
- How To Plant & Grow The Best Tomatoes
Water/Irrigation/Drought
- Keeping Potted Plants Watered
- Repurposing A Coffee Can For Deep-Soak Watering
- 3 Rainwater Collection Systems We Use
- Cheap (or FREE) Wood Mulch For The Garden
- Using Vining Plants For Living Mulch
- Surprising Use For Empty Clay Pots In The Garden
Weed Control
Garden Tips
- How To Save Outdoor Plants Even During A Hard Freeze
- Growing A Sustainable Garden: Eco-Friendly Practices
- Tricking Birds AWAY From Your Strawberry Plants
- Protecting Tender Seedlings From Wind
- Homestead Hack: Remember Where You Planted Seeds
- How I Use EcoBricks In The Garden
MORE Gardening Posts

C’mon by & sit a spell! Come hang out at our Facebook Page. It’s like sitting in a front porch rocker with a glass of cold iced tea. Lots of good folks sharing! You can also follow along on Pinterest, on Twitter or on Instagram.
If you’d like to receive an email each time a new blog post goes live it’s EASY to
subscribe to our blog
My favorite is that you painted the rock with the herb. That is a fantastic idea I am going to borrow. Thanks for sharing at Let’s Get REal Friday. Oh and cucs are easy to grow.
LOL – I love the way those painted rocks look in the garden, Karen. And I used rocks I found right here on our Homestead so they’re a part of this property in the greatest sense of the word. ~TxH~
Thank you for sharing such an informative post!
We had a garden years ago, but the critters ie. ground hogs and rabbits became relentless and we haven’t had one since. 🙁
There truly is nothing like growing your own vegetables and it is so therapeutic to work in the garden. 🙂
Blessings.
I was worried about critters when we started planning my veggie garden after moving here. RancherMan put a pretty fence around the garden area but although it looked beautiful it certainly wouldn’t keep the rabbits out. So he lined the bottom 18″ of my garden fence with chicken wire, rolling the bottom 6″ or so outward so they couldn’t dig under. We’ve got lots of rabbits out here yet they’ve not been able to get to my garden. So far the squirrels have left it alone too for some reason. Dumb luck maybe?? But I agree with you, it’s so therapeutic to work in the garden. ~TxH~
Thanks for the grass tip. We don’t have hay like material but we do have free wood mulch available to us from the city! I repurposed our sandbox into a garden bed this year and used old seed packets which so far have germinated!
RancherMan likes to mulch the grass & leave it when he mows but I beg him to give me one bag full at least – grass clippings are invaluable in my garden since they’re already chopped so small. Careful not to put freshly-cut grass next to your plants, they’ll burn. I always set the clippings aside for a few days until they cool, then use them as top dressing over the grass mulch already laid down in previous sessions. Works beautifully for me! ~TxH~
I really enjoy your blog and articles. I especially like this article about mulching. We just started mulching our garden this year, it’s fully planted, but my plants aren’t growing as fast and big as I thought they would. But, from my understanding it takes a few years for all the mulch to break down and begin to be beneficial to your garden. I am composting as well and can’t wait to see the benefits of using it in my garden. I am looking forward to not watering as often, as you know this Texas heat takes the moisture right out without a ground cover. So as for me, I’ll wait it out and see how it progresses, there’s surely multiple benefits of mulching. Thank you for your inspiration and encouraging articles.
Teresa, you will improve your garden soil bit by bit, the difference will be amazing. And the mulching will help your plants withstand the heat and dry summers here. Keep up the good work. ~TxH~
I reused the piece of an old wire fence to make trellises for cucumbers and peas. Good luck with cucuzzi (that’s a new one for me), hope you’ll share some yummy recipes later! Thank you for sharing at Thursday Favorite Things!
Wow, some great ideas and tips here! I love the rock as a marker and the tip about drying the grass before using it on the garden (I always put it on wet, oops!). Thank you for sharing this week on the Art of Home-Making Mondays! I always learn something here 🙂
Great ideas! Low cost and re-usable always catch my attention. 🙂
I definitely like to cover the ground so I don’t have to weed.
your gardening tips are so wonderful I’m almost tempted to put a garden in!!
Diana
Taking a year off, doing just flowers for a butterfly/bee garden. But these hints and tips will be handing for next year! Love reading all the great posts you share 🙂
Interesting post and I envy your blackberries – which I had room because there is nothing better than anything blackberry. I have used milk cartons for seedlings they almost serve as a miniature greenhouse. This year I am going to make markers out of used canning lids and pop-sickle sticks. We are also going to use rocks like you did as an activity for the kids in our community garden. They can use markers to color pictures on them as decorations for their parents’ garden. Thanks for sharing on the Four Seasons Blog Hop.
Hi, visiting from the lifeasweknowitbypaula no rules blog hop. I liked the basil rock and will give this a go for my veggie patch although some of the basil is not doing well. A big grasshopper had an all day feed on Tuesday leaving just sticks on one previously nice plant. Fran
Thanks for sharing this post on the Green Thumb Thursday Blog Hop. I will be posting this on our Green Thumb Thursday Pinterest page as well as on my personal G+ account.
I am always finding useful ways to use what some would consider junk on our farm. I love the challenge of making it look nice without spending a lot of money.
I love how you used the rocks to mark your plants! I need to try this.
Oh yeah, we’re big on repurposing in the garden here. It pays to rethink the use of everyday items. Just think of all that money you’ll be saving for something to add to the garden!
What a great find Matt, and you’re so industrious to put it all to such good use! ~TxH~
I found someone throwing away a stack of 8 foot split cedar fence railings. I brought home a few and split them lengthwise. I now have tomato stakes and fence posts for the chicken wire I use to keep out critters.
It definitely seems to have been windier here as well this spring. We have bamboo (both running and clumping) and I’ve taken advantage of what I once thought was a nuisance and use it for staking. I’ve saved the rims from my broken clay pots thinking I’d use them for plant markers for my herbs. I’ll have to try out a paint pen like you mentioned. To help ward off birds and deer, I hang old CD’s in the garden, using repurposed shelf brackets screwed to a hefty wooden stake. Even at night when some pesky critters are more active, I can see the glint as they spin in the breeze.
I love gardening, or, I did. Fighting the heat, drought and mostly, the fire ants, has done me in. Someone is going to make good money off me at the farmer’s market this year!
Oh yeah, heat, drought & fire ants are a constant battle – and BERMUDA GRASS! Frustrates me to no end, but it’s in my blood & I’ve just gotta garden. ~TxH~
I use milk jugs with the bottoms cut off.. I tell folks I am growing dairy! 😀 Anyway, it works great here at Windy Thistle Farm. We’re on top of a ridge in the Missouri Ozarks and the wind is just vicious. This does work and the plants do get along fine after a week or so.
Awesome Eileen, thanks for the tip. Sounds like there are lots of folks that deal with the same wind issue. One question – how do you keep the wind from blowing away the milk jugs? ~TxH~
your garden looks wonderful and everything is growing quite well from the looks of your pictures.
I like your markers for your herbs :} I have also used broken clay pots as markers. I just don’t have the heart to throw anything away especially if it’s usable.
For young seedlings I have used vegetable cans or even the metal coffee cans if you can still find them by removing the top and bottoms of the cans and pushing them in the soil over your seedlings which protects them from the strong Texas winds.
Cutting the bottoms off milk cartons also work and leaving the cap off or can also cut part of the top off as well. Milk cartons also make for wonderful little greenhouses as well as soda bottles.
Have never had cucuzza squash. You must let us know what it tastes like.
I’ve seen the cans lining the veggie gardens before Colleen but I always thought they were for cutworms. I’ll have to give that a try as well & experiment with what works best here. Thanks so much (as always) for your thoughtful comment & helpful advice! ~TxH~