
by Texas Homesteader ~
RancherMan & I enjoy eating salads almost daily. I feel it offers two main benefits.
First that dose of fresh veggies is obvs gonna be healthy. And secondly, enjoying that crisp salad before supper puts my appetite in check by the time the actual entrée is served.
Plus, I can make a very Healthy Salad Dressing in only about 1 minute using unflavored yogurt and lemon juice as a base. So our salads are not only delicious but very healthy too.
But I hate how perishable lettuce is. And the fact that it’s always encased in plastic (at least where we live)
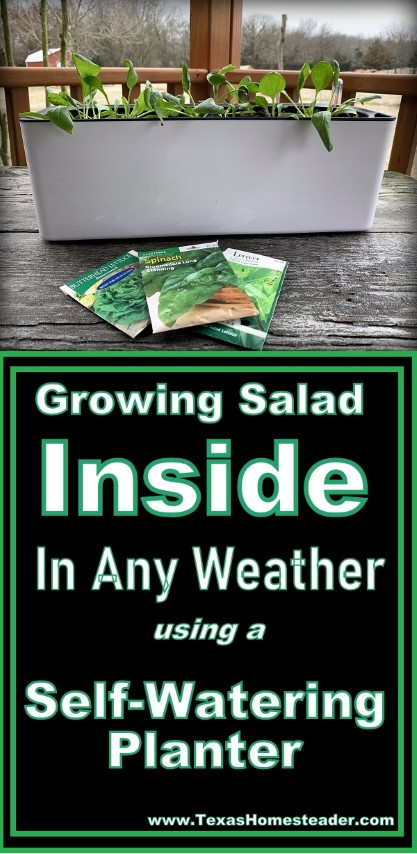
For Christmas I was gifted a windowsill salad growing kit, including two self-watering planters, seed-starting mix and a couple of packets of mixed salad greens. Let’s DO this!
(Note: Some links in this post are for further information from earlier posts I’ve written. But links preceded with * are affiliate links. If you click them and buy something (almost anything, not just the item noted) I could receive a tiny commission. But the price you pay will NOT change. It’s an easy way to support this blog without anything coming out of your pocket. So click often! Thank you!)
When we’re enjoying salad I’ll add all manner of ingredients based on what we have on hand. Anything from chopped carrots, onions, fresh tomatoes, chopped Boiled Egg, etc.
An added benefit I’ve noticed when we start our meal with a salad is that I typically see the scales inch downward too. So we often start our evening meal with a healthy, delicious, crisp salad.
I’ve planted lettuces in the garden in the past. But it just seems that since lettuce likes cooler weather, it bolts before I really get any meaningful harvest from it.
There has to be a better way. Maybe I should give growing lettuce inside on the windowsill a try.
Self-Watering Planter Features
I love the type of self-watering planter we got for a couple of reasons. First, the planters from NiHome came with not one, but TWO *Self-Watering Planters.
Now that’s just double the fun, y’all!
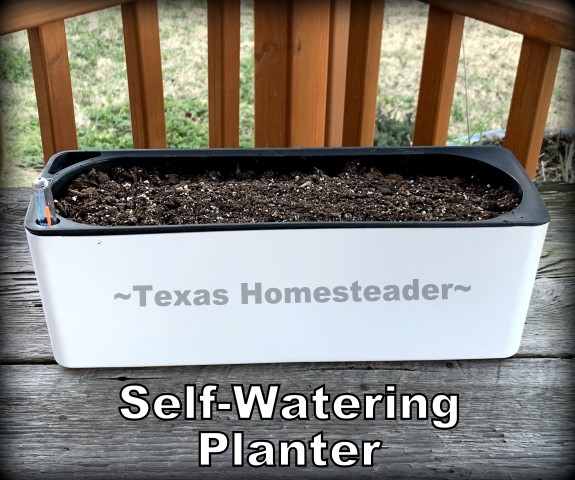
Plus the planter size is 15.83 x 11.14 x 6.02 inches. For us that’s the perfect width and length to sit on a windowsill.
Many planters were just a touch too bulky to sit on a windowsill or they were too small to offer any real growing space.
And since I have two planters I may very well move one of them to the back porch when spring hits in all its glory.
I bought a couple of packets of *salad-mix lettuce seeds. So I’ll have plenty for the foreseeable future to plant these planters time and time again.
Maybe I’ll plant that second planter with more salad lettuces, or maybe I’ll add something else like herbs or edible flowers instead. All the more reason I’m glad to have two planters!
The self-watering planter we got has a place for you to drill drainage holes so if it’s overfilled the excess water can drain away. But the planters don’t come PRE-drilled so you can omit that hole if you’re going to have it sitting on a wooden windowsill.
We opted to leave the holes undrilled for that reason. I’ll just keep an eye on the water level myself and top it off when it needs more water. Which brings me to the next reason I love this model…
Easy Water Level Indicator
I love the fact that it’s easier on these planters to see how much water remains in the reservoir. Some self-watering pots only have a small semi-see-through area on the side of the planter itself for you to see how much water remains.
But this one came with an actual automatic floating gauge.
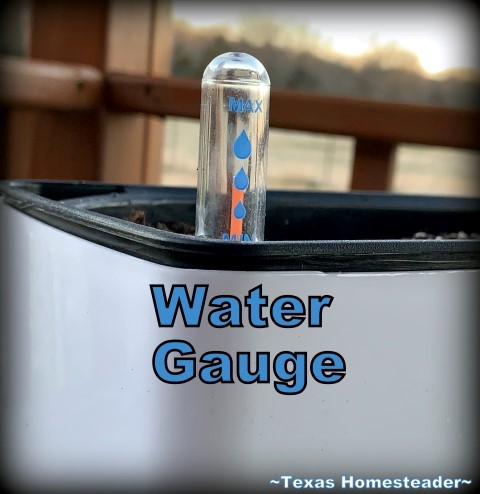
I love this so much more. No moving the pot around to try to get a leveled view of an obscure little window against the glare of the light coming in through my kitchen window.
A quick glance tells me when it’s time to add more water. Easier is better for me that’s for sure!
Assembling Our Self-Watering Planter
Assembling the pots couldn’t be easier. First we put together the little floating gauge and added it to the planter.
Then we finished assembling the *Self-Watering Pot by placing the black inner insert inside the white outer shell.
When it’s assembled the inner insert leaves a space between the two containers to hold the water. It also has irrigation holes throughout to allow the water to infiltrate the soil you’ll be placing into it.
Don’t Use Potting Soil
It’s recommended to use seed-starting mix when planting seeds in a pot. Potting soil is just not ideal, those seeds need a lighter mixture to begin to grow.
Now once your little seeds grow into seedlings you can transfer them to a larger pot using potting soil later on. But to get the seeds started, it’s best to start with this lighter seed-starting mix.
It’s also recommended to dampen the seed-starting mix before planting.
So I poured some seed-starting mix into a container & added water, mixing it all up with my hands until it was uniformly damp but not dripping wet.
Then I lightly packed that seed-starting soil into my pot and sprinkled a few seeds on top. Finally I lightly sprinkled more soil on top of the seeds and pressed gently to make sure the seeds made good contact with the soil.
Is Fertilizer Really Necessary?
I’ve read that although seed-starting mix soil is best to help seeds grow, it offers precious little nutrition.
So I added some *water-soluble fertilizer into a small bottle I keep to water my plants. Then I topped it off with some rain water I’d harvested, shook it up and added that water to the water inlet area in the corner of my planter.
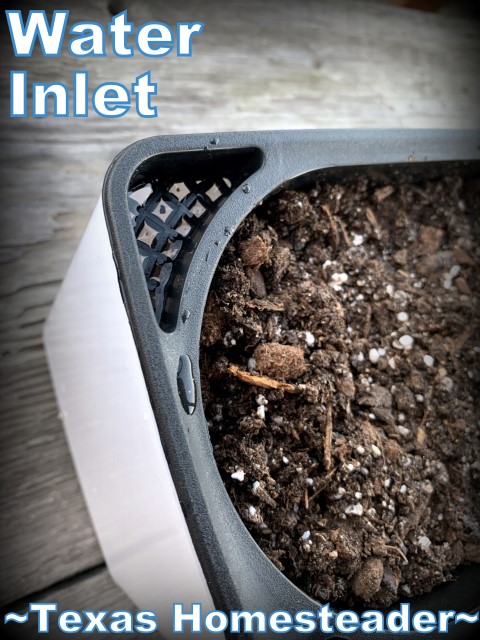
As I added the water, I watched the water indicator raise. I love that thing! No more guessing whether or not there’s enough water remaining in the reservoir. A quick glance tells me!
Getting My Seeds To Grow
I have a spray bottle in which I keep regular tap water. So I sprayed the surface of the soil until it was uniformly damp and placed a light, thin piece of waxed paper over the top to keep it from evaporating.
This waxed paper sheet was just a repurposed bag from a grocery product we’d purchased. #UseWhatchaGot!
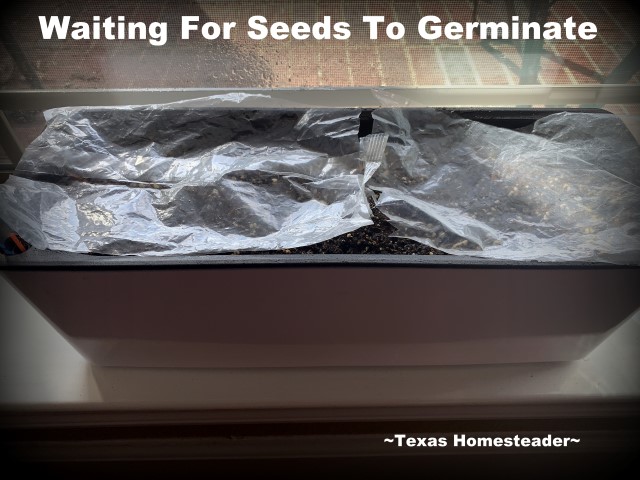
Every morning I’d anxiously lift the paper to see if there were any baby sprouts yet.
HA! Please tell me I’m not the only impatient gardener who checks their planted seeds within hours of planting!
As soon as I saw signs of life I removed that piece of waxed paper. Each morning (and sometimes throughout the day as well) I’d use my spray bottle to lightly spray the surface of the soil.
I know until those tiny roots grow long enough to fend for themselves I’ll be adding this spray of moisture every day to keep things moist on top of the soil. It wasn’t long at all before the little seedlings started to grow.
Proper Lighting For Seedlings
I placed the self-watering planter on a south-facing windowsill so it would receive the most sunshine. But I also know it’s difficult – even in a south-facing window – to give the little seedlings the light they really need to grow strong and keep them from being leggy as they reach for the light.
Luckily as part of my salad-growing gift I was also gifted a *Clip-On Grow Light. This bad boy has various settings including red light, blue light or mixed light depending upon the plant’s growth needs.
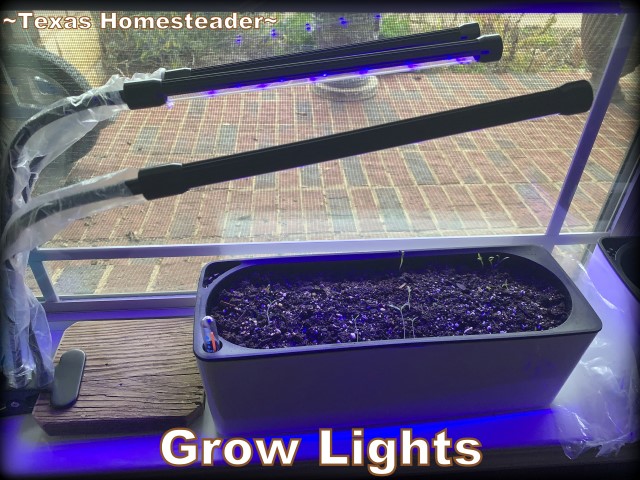
I’m not gonna lie, it was a little weird walking by and seeing red and/or blue lights coming from the window! LOL.
But I’m reading that depending upon the stage of growth, different colored lights offer different benefits. So I started out with blue light when the seedlings first started. Then I changed to a mixture of red/blue once they started putting on their true leaves.
My grow light even has a timer. So I can set the grow light to automatically turn on and off at the same time every day without any further action by me.

Easier with less hands-on or having to remember mundane daily tasks works for me. We’re busy here on the Homestead and I’m sure you are too!
Making My Grow Light Self-Standing
But I didn’t want to clip the grow light to the surface of these pots. I preferred it to be free-standing for more flexibility. But how? I asked RancherMan for his thoughts.
I swear that man can take any of my requests and make them reality, let me tell ya!
He went into the shop and cut a 6″x6″ from a scrap piece of deck board wood. It was long and wide enough that when I clipped the grow light to it there was enough ‘footprint’ to allow the light to stand freely!
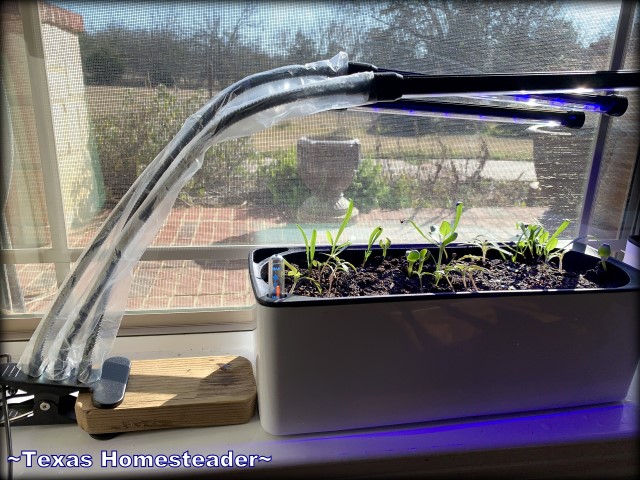
So I set it up next to my planter and fanned the three lights over my new lettuce seedlings.
Although I started out with blue light, they’re currently growing under a combination of blue & red light.
I suppose it won’t be long before we’ll be able to start harvesting our very own salad greens. How exciting!
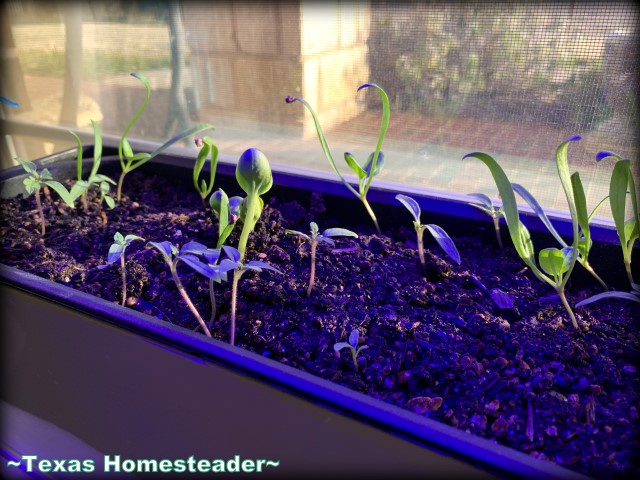
And I’m planning to harvest them the same as I typically harvest spinach – leaf by leaf. That way after I’ve harvested from the plant it can continue growing so I can harvest from it again at a later date.
I’m so thrilled with this self-watering planter gift! It satisfies the gardener in me by allowing me to grow salad lettuce even in the frigid or snowy (or often ICY here in Texas) winter months.
And it also satisfies the eco-warrior in me by being able to enjoy healthy salad lettuces harvested not only fresh but also plastic free!
~TxH~
This post categorized in 
Links In This Post
- Easier Boiled Eggs WITHOUT Shells
- Creamy, Healthy Salad Dressing In 1 Minute
- *TWO NiHome Self-Watering Planters
- *Self-Watering Pot Options
- *Salad-Mix Lettuce Seeds
- *Clip-On Grow Light
- *Water-Soluble Fertilizer
- 3 Rain Water Catchment Systems We Use
My Favorite Garden Hacks

- Easy Garden Planning Spreadsheet
- Getting A Jump: Planting An Indoor Greenhouse
- Repurposed Cardboard Seed-Starting Pots
- 3-Sister’s Garden – The Original Companion Planting
- Low-Cost Vegetable Gardening
- Planting A Large Galvanized Trough
- Using Cheap Biodegradable Weed Block
- Tricking Birds AWAY From Your Strawberry Plants
- Easy Compost For A Healthy Garden
- Propping Tender Seedlings
- Cheap (or FREE) Wood Mulch For The Garden
- Homestead Hack: Remember Where You Planted Seeds
- How Vegetable Gardening Can Change Your Life!
- Keeping Potted Plants Watered
- Planting Potatoes In Galvanized Trough
- Planting A Blueberry Bush In Galvanized Tub
- Stevia – Growing Your Own Sweetener!
- How I Use EcoBricks In The Garden
- Making An Inexpensive Temporary Cold Frame
- Compost Old Confidential Documents
- Repurposing A Coffee Can For Deep-Soak Watering
- How Leaves Benefit Your Garden
- My Simple, Zero-Waste Herb Drying Setup
MORE Gardening Posts

C’mon by & sit a spell! Come hang out at our Facebook Page. It’s like sitting in a front porch rocker with a glass of cold iced tea – lots of good folks sharing! You can also follow along on Pinterest, Twitter or Instagram.
If you’d like to receive an email each time a new blog post goes live it’s EASY to
Subscribe to our blog!