
by Texas Homesteader
Several years ago RancherMan & I constructed three raised beds to hold my beloved veggie garden. The beds worked well and produced heavily for several years but after a while the wood began to rot and I had some problems with the design. It was hard to irrigate the three beds without ‘jumpers’ from one bed to the other creating a difficulty maintaining the walkways. And the walkways were a bit too wide anyway.
I wanted to connect all the beds to help make a continuous run for irrigation to correct that problem. Then Rancherman decided to enlarge the width of the beds just a bit, also shrinking the walkways. YEA!
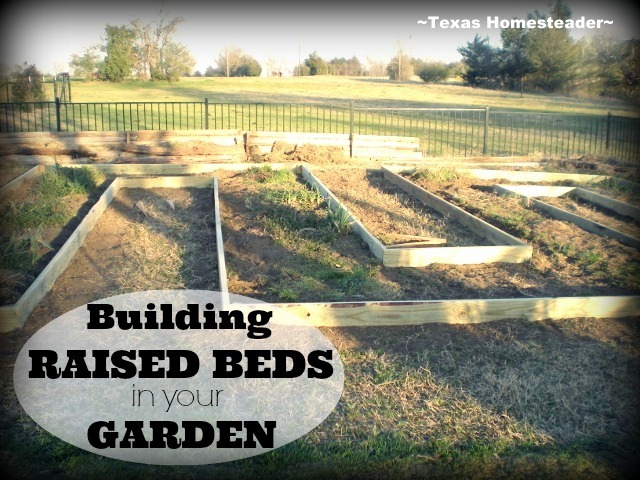
We decided to add one additional raised bed to the garden area since idle ground is just a lawn-mower chore, something I’d like to reduce if at all possible.

And of course the connecting beds on opposite ends of the long runs means more planting area as well. I’m going to LOVE this new design!
Buying Supplies
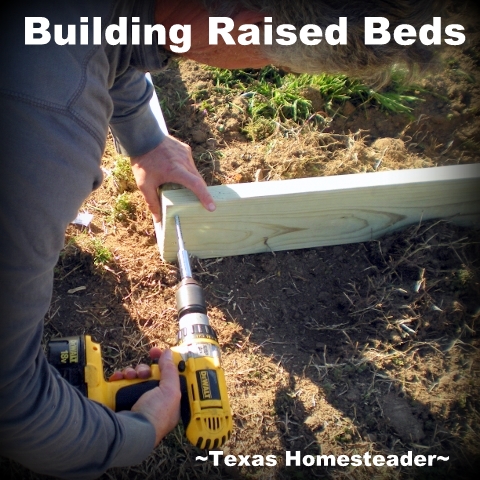
RancherMan bought rot-resistant 2×6 lumber and hardware – and when the big day came for us to demolish the beds I was beyond excited. The current beds were being overrun with late-winter weeds so there promised to be lots of work to be done but I was up to the challenge.
We started out by removing all the old wood that surrounded the current raised beds. I got busy the with the lawn mower & scalped down the late-winter grass to give us a good starting point. Then RancherMan got started swinging the sledge hammer to dismantle the old wood beds while I got to work removing nails & screws from the wood so I could repurpose it for my compost bed. He & I work well together, like a well-oiled machine.
When all the old wood was removed RancherMan ran the tiller along the lines of the previous beds, as the new beds would be slightly larger to fully utilize the entire lengths of the new wood with no waste. This tilling would also give him some soft ground to be able to better set the new boards in place.
Building New Raised Beds
When the area around the beds was tilled we got to work moving all the new wood into the fenced garden. RancherMan laid out the design I wanted & started placing the new boards in place.
He drilled a couple of holes in the end of each board and then used lag bolts to firmly secure the boards together. He declared “Now these babies so sturdy they aren’t going ANYWHERE!”
Using Gathered Building Trash
Here’s an interesting side note: When our house was being built years ago we had a construction dumpster placed on the property to receive construction waste. We were to be billed by the weight of the dumpster after we filled it. And there was a pretty heavy additional fee if it went over a certain weight. Brick pieces and paint buckets and all manner of construction waste was placed in the dumpster. But to keep the weight down we decided we could make a burn pile with the wood cast-offs.
Many of these wood-cut angles were present and we decided to keep them for various uses on the ranch. I’m so surprised that we’ve used these angles a LOT as stakes for various things. Like when we plant new trees or need to anchor something in place. We also used them to stake the previous raised beds when they were initially built. And we’re using more of them today as we’re building these new raised beds. That really speaks to my crunchy-green heart!
One Continuous Raised Bed
Anyway after the beds were built and staked down we stood back to admire the hard work. Although I now need to get busy clearing the growth from my new beds and preparing the soil for planting, I’m amazed at the Before-N-After difference. Now C’MON SPRING!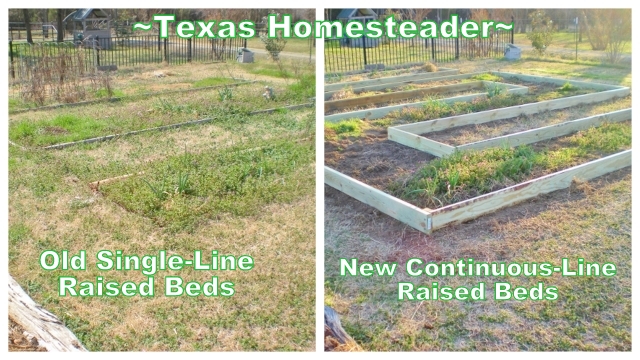
I’m going to love my new raised beds. And I’ve been daydreaming of warmer weather & spending some time laying out what will be planted there. Come see my veggie garden worksheet!
~TxH~
This post categorized in 
My Favorite Garden Hacks

- Easy Garden Planning Spreadsheet
- Getting A Jump: Planting An Indoor Greenhouse
- Repurposed Cardboard Seed-Starting Pots
- 3-Sister’s Garden – The Original Companion Planting
- Low-Cost Vegetable Gardening
- Planting A Large Galvanized Trough
- Using Cheap Biodegradable Weed Block
- Tricking Birds AWAY From Your Strawberry Plants
- Easy Compost For A Healthy Garden
- Propping Tender Seedlings
- Cheap (or FREE) Wood Mulch For The Garden
- Homestead Hack: Remember Where You Planted Seeds
- How Vegetable Gardening Can Change Your Life!
- Easy Deep-Soak Watering
- Planting Potatoes In Galvanized Trough
- Planting A Blueberry Bush In Galvanized Tub
- Stevia – Growing Your Own Sweetener!
- How I Use EcoBricks In The Garden
MORE Gardening Posts

Pingback: Saving Money On The Grocery Budget #TaylorMadeRanch
Pingback: March Garden Update - Trying Something Different!
I love your raised beds! I’m hoping to build some this spring too.
Thanks for linking up with Green Thumb Thursday! We hope to see you again this week!
~Lisa
This area looks great and I can’t wait to see what it looks like once it is planted and going. Thanks for sharing at Good Morning Mondays. Blessings
What a great idea! It will make a great garden! Thanks for sharing at our party… hope to see you again on Thursday! 🙂
I love my raised beds. And you know making them was not as hard as one might think. They look pretty too! Thanks so much for sharing on the (mis)Adventures Mondays Blog Hop.
I love the new beds they look like a maze. We need to build some raised beds in our garden space to plant strawberries and such. I need to find some more scrap lumber.
Thanks for Sharing at Simple Saturdays.
Hugs from Oklahoma,
Valerie
Cottage Making Mommy
I sure will Amy – OMGosh I can’t wait until spring! ~TxH~
Love your new raised bed design!! My husband and I built a raised bed last year and I love it so much. It’s a bit like yours…it’s in the shape of an E but I don’t have near as much a space as you do! I hope you’ll share pics later in the year when you have everything planted!
Wow, you have such a large area. I love the way you laid the beds out. Thanks for sharing this great post at the This Is How We Roll Link Party. I can’t wait to see what you bring next week! I am sharing this on one of my social medias!
The new arrangement of the raised beds is certainly more efficient Cynthia. I love them. Thanks for the share! ~TxH~
I love your raised beds. And expanding is always exciting. We don’t have raised beds but we are planning to expand this Spring and I’m excited about that.
We have a raised garden and love it. We did some remodeling a couple of years ago and used the soil from that project. Stopping by from This is How We Roll link party.
Thanks for posting. For some 3 years now we have raised beds in our garden but most of them are made with stones. The ones made in wood by now we had to replace them. We have been rotating the vegetable every year and its works great. And yeh, small pathways. I like the new designs you made. popping by from Wednesday linkup party.
Oh how I’d love to have beds made with stones – you’d never have to replace them! Love that. ~TxH~
Your raised bed garden looks fantastic! I do appreciate you sharing with Home and Garden Thursday,
Kathy
These turned out great! I am wanting to try some raised garden beds this year.
Thanks Michelle – I really love them. ~TxH~
We love our raised bed gardens. The chickens loved them too so I had to put a fence around them….silly chickens!
LOL Lucy! Thankfully we already had a fence around our gardens – they really do like to scratch around don’t they?? ~TxH~
I love raised garden beds! We’re putting ours in this weekend! This post got me super excited!
That is exciting Stephanie! ~TxH~
Our raised beds are falling apart too. We have all the materials now I just need to find the time to actually rebuild them.
I know Shelly, it seems there’s never enough time to do everything that needs to be done! ~TxH~
These look wonderful ! Enjoy! 🙂
Please send me your posts.
Hi Arlene, luckily signing up to receive our posts via email is easy. Simply click the email icon in the right hand column under “FOLLOW US”, enter your email address & submit. You’ll receive a confirmation email to confirm your wishes for email updates and after you confirm BOOM – you’ll never miss another post! 🙂 ~TxH~
Pingback: Garden Update For March
Pingback: Links Worth Sharing: Week of March 15, 2014 - Simply Frugal
Love the new raised beds! Thanks so much for sharing on The HomeAcre Hop! Hope to see you again today 🙂
I think it turned out great! Enjoy your planting!
Thanks Daisy – I have my ‘indoor greenhouse’ going and many of my heirloom seeds have already begun to sprout. Can’t WAIT for spring!! ~TxH~
What a great idea to get rid of the irrigation run problem! We have four separate beds and had to step over hoses all summer last year. Thanks for sharing!
Thanks Betsy, I’m really hoping this means we can now lay some permanent drip irrigation instead of the soaker hoses we used last year to preserve water even better. ~TxH~
Love this idea! I’m in FL so we don’t have dirt – just sand. I’m currently gardening in containers, but I’d really like to have a bigger space! I’m saving this idea. 🙂
Mona, the beauty in veggie gardening is you can go as big or as small as you like – as big as cultivating an acre, as small as tomatoes & peppers grown on the back porch in pots. Over the years we all find out where our garden comfort level is, I think I’ve finally found mine & I love it. ~TxH~
Hey Mona. I’m in FL too and volunteer on the weekend at a farm that is over 4,000 square feet and ALL container. It’s amazing what can be grown with just grit, determination and enough pots! ;0)
Love the looks of your raised beds.
Thanks Colleen, I’m anxious to see how the beds do this year. I’ll be sure to share throughout the growing season so stay tuned. ~TxH~