
by Texas Homesteader ~
Y’all know I shun plastic like a banshee, right? I haven’t accepted a plastic shopping bag from the store in years, much preferring my pretty shopping basket anyway.
And I refuse to buy overly-packaged items too. I’ve learned that recycling isn’t the answer to our landfill problems – PRE-Cycling is!
But what is precycling? Well that’s shunning trash from coming into your home in the first place.
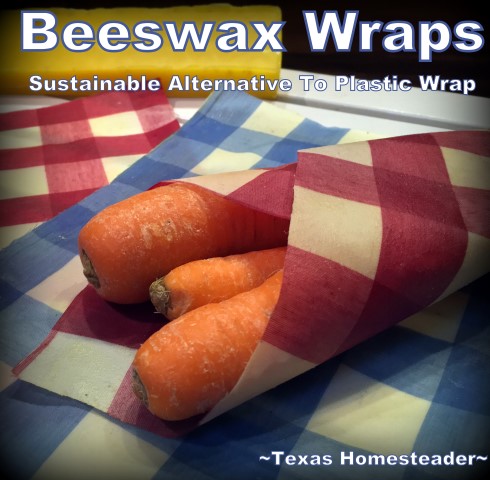
But today I’m talking about cling film. You know the stuff, it’s always sticking to itself and hardly ever sticking to the item you’re trying to wrap. Use it once & throw it away.
But whaddyagonnado?? Well, I’ve started using beeswax wraps!
Keeping It Natural
Some people add various ingredients to their beeswax wraps such as tree resin or jojoba oil. This is supposed to make the wraps more pliable & sticky.
I’ve added those things in the past as well, but I much prefer my beeswax wraps to be as pure as possible.
Now I typically use only natural beeswax. Only 2 ingredients: lightweight material (preferably cotton) and grated beeswax that has been harvested & filtered from our own beehives.
(Note: I often sell our beeswax as well as natural reusable beeswax wraps on our online store too – be sure to check it out.)
 I like a wrap that’s anywhere from 8″ square to 10″ square. You can have them larger but to me it makes them too bulky & heavy – it’s just too much wrap.
But a wrap 8″ to 10″ square is typically the perfect size to cover a block of cheese or maybe a bowl of leftovers in the fridge.
Choosing The Fabric
I start with a thin fabric which seems to work best. Sometimes I’ll find remnants at an estate sale. That makes my crunchy-green heart happy because I’m putting to use something that’s already been manufactured but is no longer needed.
But not being an accomplished seamstress this means I’m not sure of the actual fabric content. So sometimes I actually purchase the fabric from a fabric store.
These purchases allow me to know what the actual fabric content is. If I’m buying from the store I always strive for a cotton-based fabric.
Preparing The Fabric
First I’ll wash and dry the fabric. I’ve read that it needs to be washed & dried beforehand to remove sizing added by manufacturers.
Not being a seamstress myself I can’t verify the validity such things. But either way I figure it’s best just to make sure everything is clean & ready to go anyway.
Cutting The Fabric
When the fabric’s been washed & dried I measure out a square of approximately 9″x9″ and mark it with a chalk marker. Then I cut out the square with pinking shears.
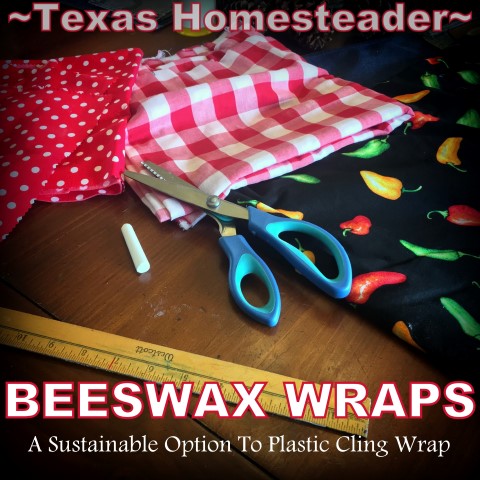
My first wraps were just cut with ordinary scissors. But I’ve heard that cutting with pinking sheers helps to keep the fabric from fraying. So I often cut with pinking sheers instead now. Plus I just like the way it looks.
Making Beeswax Wraps
After my fabric is cut I place it on a piece of parchment paper inside a cookie sheet I have for only beeswax purposes. This way if any melted wax escapes it’s contained on the cookie sheet.
Then I grate some beeswax & spread it even-ish onto the top of the cloth.
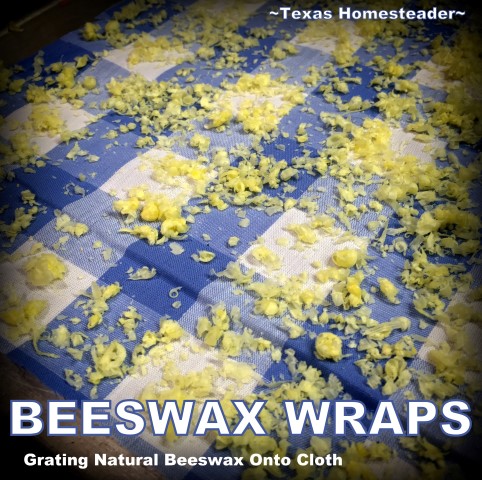
I cover the cloth with another piece of parchment. Now I take a lightly-hot iron and run it along the parchment paper on top of my cloth.
The beeswax will then melt and be absorbed by the cloth. I can usually see through the parchment paper and am able to tell where the iron is pushing all the melted wax. This helps me get the entire piece of cloth coated in beeswax.
Assuring The Entire Cloth Is Waxed
Now quickly I remove the top piece of parchment and pick up the hot cloth. (Careful, it really IS hot!)
A few quick waves in the air and the beeswax cools. If I hold it up to the light I’ll be able to see if there were any spots missed.
If so I’ll sprinkle a little more beeswax in that spot, cover with parchment paper and iron again until the entire cloth is coated.
Then I set it aside to allow it to cool completely. Now we’re done! I fold it and put it in my kitchen cabinet.
Using Beeswax Cloth
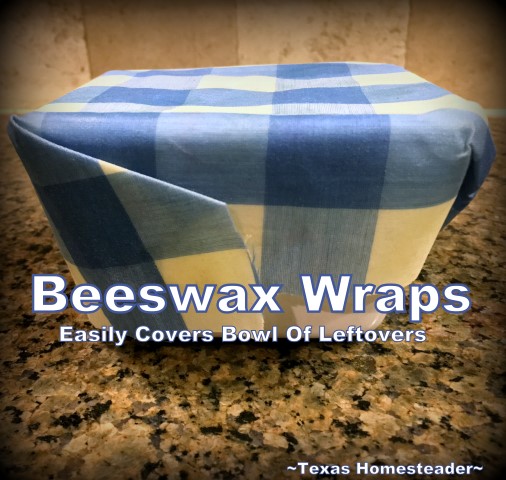
When I’m ready to use one of my wraps I retrieve it from the cabinet and wrap it around the item to be covered.
Today I’m covering a small square bowl of leftover chicken & noodles. I place the wrap over the top of the bowl and using my hands I press the wrap to the sides of the bowl.
You can see some light fraying with this wrap – it was one of my first made. It’s only a small thing but this is why I now prefer to cut with pinking sheers instead.
I still love this wrap & it’s still very functional – I use it all of the time! The warmth of my hands helps mold the wrap to the bowl and voila! Into the refrigerator it goes.
Beeswax Wrap Care
There are a few things to remember when using beeswax wraps.
- Since they’re made with wax – keep them away from heat which will obviously melt the wax. (ie: Better not to cover hot food.)
- And since you have to keep them away from heat, only wash beeswax wraps in warm soapy water & rinse well in warm water – not overly hot water. Then set it aside to dry and it’s ready to be used again & again.
- It’s best NOT to use your beeswax wraps to cover raw meat. I typically use it for covering leftovers in the fridge, leftover blocks of cheese, veggies, etc.
I love my beeswax cloths. Partially because I’ve made them myself and partially because the wax was provided right here by our own bees.
And even partially because they save both money & the environment. But mostly because it’s yet another way I’m shunning disposable plastic crap!
And let’s face it – the beeswax wraps in my kitchen are prettier anyway!
~TxH~
This post categorized in 

Links In This Post:
- Reducing Plastic: Amazing Traveling Basket
- Precycling – How We Reduced Our Landfill Contributions
- How To Purify Natural Beeswax
Other Great Posts About Reducing Plastic
- Reducing Plastic Is Easy
- I Love Mother Nature So I Recycle LESS!
- 7 Ways To Reduce Plastic In The Kitchen
- Ditch The Plastic! Using Glass In The Refrigerator
- Natural Air Freshener In Reusable Glass Jar
- Reducing Plastic In Personal Hygiene: Deodorant
- No More Plastic Razors – How To Use A Safety Razor
- Where Exactly Is ‘Away’?
- Replacing Plastic Wrap With Beeswax Wraps
- Eliminate Plastic Produce Bags
Reducing Household Waste
- Repurposing Empty Coffee Containers
- Denim Repurposed Into Fun Crafts
- 5 Zero-Waste Products We Love
- Easily Reduce Or Eliminate Junkmail
- Making Your Own Pourable Sugar Jar
- Paper Napkins In A Paperless Kitchen
- Repurposing A Parmesan Cheese Lid
- Zero-Waste Hygiene
- Natural Cleaning – Homemade Laundry Detergent
…and Many More
All Eco-Friendly Posts

I like how you make your own “paper” to wrap food in. Nice not to have to throw something away after using. I have a question. I recently bought a box of Reynold’s Freezer Paper. I was in a hurry and didn’t read the box and found when I got home it was coated with plastic. I thought it was coated with wax when I bought this last year. I am using it to freeze meat. Do I remember correctly? Have you used freezer paper?
Ya know Cindy, I think lots of things that used to be coated in wax are now coated in plastic instead, such as many of those cartons of milk, juice, ice cream and such. I’m not sure there’s any carton or freezer-paper product that’s actually wax coated anymore. Having said that, I think freezer paper certainly has its place and I’ve used it in the past and won’t hesitate to use it in the future. But I’m not sure my beeswax wraps would be effective in the freezer without damaging them, so I reserve the beeswax wraps for either countertop or refrigerator food-storage purposes. ~TxH~