
by Texas Homesteader ~
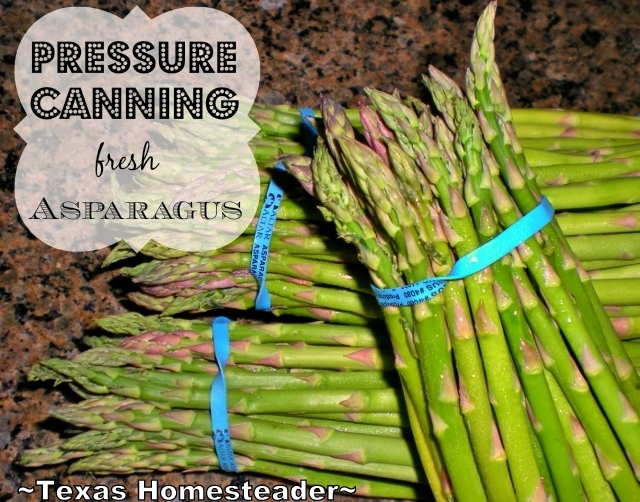
I grow asparagus in my garden each spring. But even if you’re buying it, asparagus is both fresher and less expensive when it’s in season. Wouldn’t you love to enjoy fresh asparagus throughout the year? Me too!
So I decided to preserve my fresh asparagus by canning it!
(Note: Some links in this post are for further information from earlier posts I’ve written. But links preceded with * are affiliate links. If you click them and buy something (almost anything, not just the item noted) I could receive a tiny commission. But the price you pay will NOT change. It’s an easy way to support this blog without anything coming out of your pocket. So click often! Thank you!)
Dealing With Bulk Asparagus
Lucky me – I came across a great deal on fresh asparagus and I brought home quite a bit of it. RancherMan & I both love asparagus!
So I steamed and served fresh asparagus as a side dish for a couple of days – it was blissful.
But what to do with the rest of it? I’d love to enjoy fresh asparagus throughout the year.
So I decided to preserve it by canning it! (Note, there is a list of several canning posts at the end of this post. Check it out!)
I’ll share with you how I canned my asparagus. But remember, there are lots of variables for safe canning. Things such as altitude, canner styles, etc. and they often have different directions. Please follow the directions for your canner and location for a delicious yet safe outcome.
Pressure-Canning Asparagus
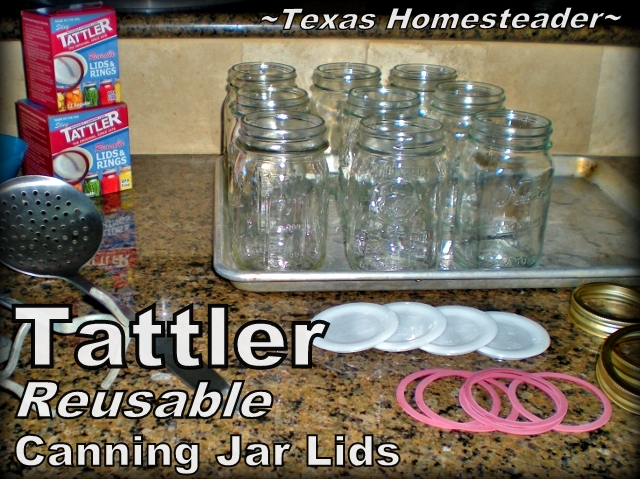
The most important thing to know is that asparagus is a low-acid food so it must be pressure-canned for safety. I decided to can mine in quart jars so that I could leave the spears nice & long.
So I brought out and washed up a canner-load of 7 quart jars. And I also brought out my pressure canner, new canning lids and rings, jar lifter, a sauce pan and a larger kettle for boiling water.
What Size Canning Jars – Regular Mouth or Wide Mouth?
Canning jars come in regular mouth and wide mouth size. I like to use regular mouth jars when canning Homemade Broth, applesauce, homemade tomato sauce, jams & jellies, etc.
Regular mouth jars work fine for these foods since it’s easy to remove them from the jars. Plus regular-mouth canning lids are usually a little less expensive than wide-mouth canning lids.
But I like to use wide mouth jars for food that’s chunkier to make it easier to remove from the jars. Things such as Apple Pie Filling, canned Pear Halves and these asparagus spears.
Although I prefer wide-mouth jars for asparagus, I didn’t have enough for all of the jars I’m canning today to be wide-mouth. So some of this batch of canned asparagus spears would have to be canned in regular-mouth jars.
But I know the asparagus will shrink a bit during the canning process so it still shouldn’t be a problem removing the asparagus from the jars when we’re ready to eat it. So I know my regular-mouth jars will work too.
Regular mouth jars or wide mouth jars – your preference works here. The canning instructions are the same whether using wide mouth or regular mouth quart jars for canning your asparagus.
After I had thoroughly washed the jars I placed them on a cookie sheet and set them in my oven heated to 220 degrees. This helps sanitize the jars & also keeps them hot as I prepare my asparagus spears.
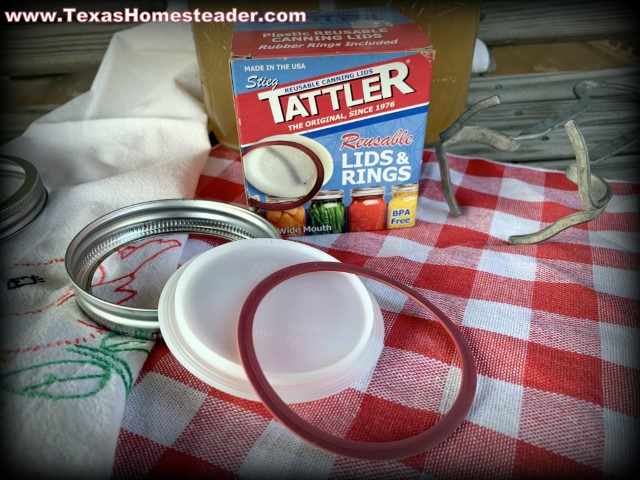
Using Tattler Reusable Canning Jar Lids
Whenever possible I like to use Tattler lids because they’re reusable. I’ve had and used (and re-used) the Tattlers I have for several years now.
If you’re using regular one-time-use canning lids the only difference will be that you won’t need the extra step of tightening the lid differently like you do with Tattler lids. Regular canning lids only need to be finger-tightened once. Tattlers are tightened less loosely going into the canner and you finish tightening them when they’re removed from the canner. All other instructions are the same.
Now I set to finishing my preparations by putting a large kettle of water on to boil, then I boiled a separate small container of water to use for my * Tattler Lids.
When the water was hot (but not boiling) I removed the pan from the heat & placed place the rubber rings in the water to soften them.
Then I washed up the flat white portion of my Tattlers and set them aside.
I love these Tattler lids! I was always somewhat dismayed over the waste of traditional canning lids because you used them once and threw them away.
But now that I’m Using Tattler Lids I’m able to wash & reuse them for years. This has been one of my happiest crunchy purchases, y’all.
About Tattler Reusable Canning Lids
Tattlers fit regular canning jars and use standard rings too. The canning procedure is exactly the same as with traditional canning lids with the exception of how tight you put them on before processing and the fact that you go ahead & tighten them the rest of the way after processing.
According to the Tattler website:
TATTLER REUSABLE CANNING LID USAGE
Tattler Lids do require a bit of variation from conventional metal lids. Being a two piece combination with a rubber gasket ring, Tattler Lids must remain a bit loose during processing in order for the jar to vent the pressure that has built in the jar during processing. An online customer gave us a very good tip on how tight is ‘Just Right’. To get the feel for the correct tightness prior to processing, place the jar on a counter top or other smooth surface, then place your index finger on the lid (do not apply too much pressure while tightening the metal band). Screw the metal band on until the jar begins to spin on the counter top (or other smooth surface). This is the perfect tightness for processing!
THE FOLLOWING FINAL STEP IS CRUCIAL TO ENSURE A GOOD SEAL:
Once the process is completed and the jars are removed from your canner, Let the bubbling die down (approximately 4-5 minutes), as this is pressure still releasing from the jars. Place a towel over the still hot jars (for safety) and finish tightening the metal bands. Now, let your jars cool naturally and when cool to room temperature, remove the metal band and lift the jar slightly by the lid. It should be well sealed. Your food is ready for storing (store without metal screw bands).
Now that all the preparations are done I’m finally ready to start canning my asparagus.
Filling Canning Jars With Asparagus
I’m using the raw-pack method so I washed the spears and cut them to the correct length to fit in my quart jars.
- Pack fresh washed asparagus into canning jars with the spear tips pointing up.
- Add about a teaspoon of canning salt to each jar .
- Poured boiling water into the jars, leaving 1″ headspace.
- Wipe the rim of each jar with a clean wet rag to make sure there were no bits of food on them that would keep canning jars from sealing properly.
- Secured canning lids onto the jars – only finger tight. (see instructions above if using Tattler reusable lids)
Pressure-Canning Asparagus
Now that my jars of asparagus are ready I placed them in the pressure canner. I canned those spears at 10 lbs for 40 minutes. (follow your canner’s directions)
Then I turned off the heat under the canner and allowed it to gradually cool and reduce the pressure inside the canner before I attempted to remove the weight.
After it was cool and the pressure dropped, I removed the canner’s weight and opened the canner lid. (be sure to always tilt the lid away from you so you’re not burned by rising steam!)
I used my jar lifter & brought the hot jars out of the canner and set them on a kitchen towel to cool overnight.
If you’re using regular single-use lids you’ll hear them plink as they cool. That tells you the jars are sealing. If you’re using tattlers you’ll test them in the morning to assure they sealed.
The following morning I removed the canning-lid rings and tested for proper seal of the flat Tattler lids by very gently applying upward pressure. The lids stayed tight. Yea – success! The jars all sealed properly.
Now that I have my asparagus safely canned, I washed the jars with a hot soapy rag and placed them in my pantry.
They’ll be ready for us when we’re in the mood for asparagus!
There ya go – asparagus for RancherMan & me to enjoy throughout the year! So much better and less expensive than the commercially canned version in the store. And zero-waste too since I’ll reuse my canning jars and Tattler reusable canning lids over & over again.
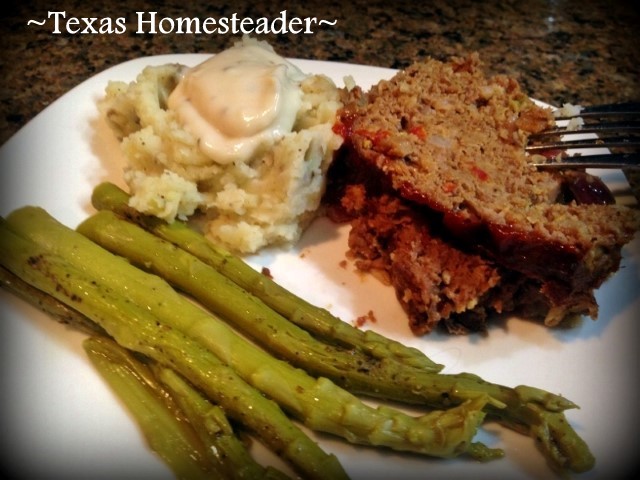
I enjoy asparagus with a small pat of melted butter and a light sprinkling of salt & pepper. What’s your favorite way to eat asparagus?

Pressure-Canning Asparagus
Asparagus is a low-acid food. So it must be pressure canned to make it shelf stable. But it's easy. And it results in several shining jars of shelf-stable asparagus in your pantry to enjoy for months to come. #TexasHomesteader
Ingredients
- 25 lbs Fresh asparagus spears
- 7 Quart Large-mouth canning Jars, (can use regular mouth if needed)
- Canning Salt optional
Instructions
-
Wash a canner load quantity of quart jars (about 7). Place clean jars on a cookie sheet & place them in a cold oven, turn oven to 220 degrees to keep them hot.
-
Bring large kettle of water on to boil. You'll be using this water to pour over the asparagus when you're canning it.
-
In a separate small pan boil about 2 cups of water. Remove pan from heat & only then place canning rings and lids into the pan, cover the pan with its lid to keep hot.
-
Wash asparagus spears and cut off tough ends. Cut asparagus spears to fit into your jars. Pack asparagus spears tightly in jars, spear side up.
-
Add 1 teaspoon canning salt to each quart of asparagus (optional) and then fill jar with boiling water, leaving 1" headspace.
-
Wipe each jar mouth with a clean wet rag to remove any food residue and attach canning jar lids and rings. (the tiniest spec of food residue will keep your jar from sealing!)
-
Process in a pressure canner at 10 pounds pressure for 30 minutes (pints) or 40 minutes (quarts).
~TxH~
This post categorized in 
Tagged in COOKING![]()
![]()
![]()
![]()
![]()
![]()
![]()
![]()
Other Canning Posts
- Crazy Canning Lady: Successes & Failures
- Pressure-Canning Asparagus
- Canning Pears In Light Syrup
- Pear Preserves In Water-Bath Canner
- Water-Bath Canning Pear Relish
- Honeysuckle Jelly – Water-Bath Canned
- Canning Clover Blossom Jelly
- Wild-Plum Jelly Recipe & Canning
- Canning Blueberry Jam
- Pressure-Canning Fresh Corn
- Water-Bath Canning Homemade Apple Pie Filling
- Canning Cinnamon/Vanilla Applesauce
- Homemade Apple Cider
- Canning Fresh Tomato Pasta Sauce
- Pressure-Canning Homemade Broth
- Canning Jar Storage Solution
- Reusable Canning Lids An Eco-Friendly Option
…And Many More
See ALL Our Food Preservation Posts

C’mon by & sit a spell! Come hang out at our Facebook Page. It’s like sitting in a front porch rocker with a glass of cold iced tea – lots of good folks sharing! You can also follow along on Pinterest, Twitter or Instagram.
If you’d like to receive an email each time a new blog post goes live it’s EASY to
Subscribe to our blog!
*Amazon affiliate
!
Hi Tammy! I am just getting into canning this year. Better late than never…right? What “features” do I need to look for in a pressure canner? Do I “have to have” narrow mouth jars, lids & rings or can everything be done in wide mouth? Also, what are some “must have” essentials to get started? FYI…I’m in Lower Alabama, Zone 8b, 375 ft above sea level.
There are two kinds of canning, Tami. Most beginners start out with Water-bath canning which is simply a large pot with a canning-jar rack. You submerse the filled jars in boiling water for a duration according to the recipe. But this can only be for higher acid foods such as canning jams & jellies, fruits, pickles, etc. My water-bath canner fits 6-7 jars. Lower-acid foods must be canned in a pressure canner such as with this asparagus, most vegetables, meats, etc. Pressure canners also come in different sizes, mine holds 7 quart jars and I nearly filled it up with the chicken broth I canned yesterday so that size works right for me, but they make smaller ones too. I’d go with a new pressure canner instead of a used one. Although I typically look for used when buying, today’s pressure canners have so many more safety features than the ones of old. Mine is a Presto. And make sure your canner’s rubber gasket is soft & pliable and is firmly seated in the canner’s lid. (ask me how I know. eh hem…) LOL. I use both regular and wide mouth jars based on what I’m canning, but you can use either one based on your preference. (Wide mouths are easier to clean though) If I’m canning broth, regular mouth works fine & the lids are typically a little cheaper. But if I’m canning something that is more difficult to get out of a regular-mouth jar such as apple pie filling I prefer wide mouth – although to be honest I’ll use whatever’s handy either way. Oh, and I’ve fallen in love with tattler lids because they’re infinitely reusable. Canning with them is the same but you have to leave the ring just barely looser than the finger-tight when using regular lids. This is because they need a teeny bit of room to release pressure during processing. Then when you bring a jar with a tattler lid out of the canner you go ahead & tighten it all the way then. BUT, I love that they can be reused over & over again, unlike traditional canning lids that must be thrown away after 1 use. It speaks to my green crunchy heart! You’re gonna love canning, Tami. There’s nothing like the pride of seeing those gleaming jars of deliciousness on the shelf. Take it slow, keep everything impeccably clean and hot, and follow a trusted recipe and you’ll do great! ~TxH~
I have done canning but not asparagus yet. I am going to keep my eyes open next time I see it for sale to see if I can get any a bit cheaper and give it a go. Thanks for sharing this informative post at Good Morning Mondays. Blessings
I grew up on commercially canned asparagus, but found them really salty and mushy as an adult. I love fresh asparagus though. You will have to let me know how they taste! Maybe I will have to put some in the garden for next year. Thanks for sharing on Merry Monday.
Every time I go to a second hand store I look for a pressure cooker, but I haven’t found one yet. Those asparagus look amazing. Thanks for the submission to the HomeAcre hop. Feel free to stop by at http://www.PintSizeFarm.com or another one of the hosts to submit another this week!
Looks great! I know you’ll enjoy your harvested vegetables well this summer. I do appreciate you sharing with Home and Garden Thursday,
Kathy
I LOVE fresh asparagus. We never usually buy it unless it’s on sale, and it doesn’t last long. I had never thought about canning it. That is a good way to stock up when it’s on sale, and have it through non peak months. Thank you for sharing with us at the Merry Monday Link Party!!
Wow, I never thought of pressure canning asparagus! We always have so much in the spring, I can’t keep up with it. Pinning as a reminder for next year!
Great post!
The only kind of canning I’ve done before is with a hot water bath! Thanks for introducing me to pressure canning!
It’s easy Marilyn, just follow a few safety guidelines and you’ll be rewarded with a safe product. Delicious and so wholesome! ~TxH~
I love asparagus but have never canned it. Thanks for the info. I think I will try it next year.
Thanks for sharing at Green Thumb Thursday.
P.S. I read your other post on the dehydrator too it looks great. I think I better shop soon.
Hugs,
Valerie
Cottage Making Mommy
http://www.lovingmyheartandhome.blogspot.com
I love my dehydrator Valerie and I use it a lot, especially with garden overage that I’d be scrambling to preserve. And by placing it outside keeps the heat & humidity outside during these hot humid summer months. I bought this Excalibur –> http://amzn.to/1o1cXmA .
I’d highly recommend it! (If you decide to purchase a dehydrator I’d very much appreciate your doing so through my page. It won’t cost you any more, but Amazon will give me a small amount for using my blog page as your purchase portal to them) 🙂 ~TxH~
Your asparagus looks like something straight out of Home and Garden Magazine. I’ve never cared for the taste and don’t care for the gassiness it gives the hubby but he LOVES it. Thanks for joining us this week for #yuckstopshere. Come join us again next week.
Fabulous! What a treat to have home canned asparagus throughout the year! Enjoy!
I love asparagus, but our garden hasn’t yet yielded quite enough for preserving. I’m tucking this away – pinning to one of my boards – so I’ll have it for next spring, just in case!
Fingers crossed Janet! Our garden has produced enough for me to enjoy fresh while I’m in the garden and harvest for our supper a few times a season, but really not much more than that. I’m looking forward to canning my own asparagus. ~TxH~
You can’t beat fresh Asparagus – looks great! I do appreicate you sharing with Home and Garden Thursday,
Kathy
Thanks for sharing this post on The Green Thumb Thursday Garden Blog Hop. We hope you will join us again this week.
We enjoy fresh asparagus when its in season but I have never canned it! I can just about everything else and I am going to have to give this a try! 🙂 Thanks for the idea.
Hi Tammy – My boys LOVE asparagus! Thank you for joining Fluster’s #CreativeMuster party. It was a lot of fun to co-host. Hugs, Holly
We love aspargus too, but I never thought to buy it in bulk while in season and canned it. I noticed in your picture that some of the spears are sticking out of the water….is that okay or do they all need to be submerged? I’ve never canned before and was just wondering. Thanks for sharing on Merry Monday.
I’ve never had a problem with the tips of spears sticking out of the water – you want to leave enough headspace during canning so that the water doesn’t boil out of the jar and possibly fail the seal. ~TxH~
I really love this tutorial . I love fresh asparagus . I never thought about canning them . Thank you for sharing .I’m subscribing to your news letter because I do love reading your blog . I don’t always comment but I do love it!!
Have a lovely night, Kim
Awwww Kim, what a lovely thing to say – THANK YOU!! ~TxH~
Fab tutorial – thanks for being so thorough for us newbies, Alice @ Mums Make Lists
We love to roast our asparagus with a little olive oil and sea salt. Haven’t been able to keep them around long enough to can them! When we get some on sale this summer I will definitely be snagging some to preserve. Thanks for sharing, just pinned it 🙂
Thanks Ashley. Like at your house, our asparagus never lasted long enough to can or preserve. I ended up with about 11 lbs of it and a trip out of town scheduled so I was pretty happy that it wouldn’t go to waste while we were gone. Thanks for the pin! ~TxH~
Last season I experimented with putting some surplus asparagus spears into a jar with the left over juice from a jar of dill pickles. It keep nicely at the back of the fridge and now it’s time to eat it up since the new stuff is just starting to come along nicely in the garden.
This looks so good. I love asparagus.
I fill my 4qt. blue jar with an assortment of wrapped candy for the grandkids when they come over; ( That way they can have a sugar high when they go home :} ) Actually they are only allowed 2 pieces. Hubby is allowed to have some as well. :} He has such a sweet tooth.
Honestly; I always have a large candy dish sitting around for when guests or family come over.
you’re canned asparagus looks picture perfect. I’m not much of fan when it comes to eating asparagus (just hadn’t acquired the taste for it) but hubby likes it but that is something that I just don’t prepare for him. ( I know, I’m bad)
I must say; your canning instructions are very easy and simple to do. I will be saving / printing your instructions to put in my canning binder………just in case I decide to use it some day. You just never know when I might get the urge to can a couple jars up…………maybe when it snows in July here in Texas. :}
By the way, I Love that blue glass container you have sitting there. It’s Gorgeous. I have a thing for blue jars/ containers.
Enjoy your day and have a wonderful and safe holiday weekend.
Colleen, your comments are always so thoughtful & sweet. THANK YOU! I love that blue jar too, RancherMan & I were at an auction when it came up for bid. It just spoke to me… ~TxH~