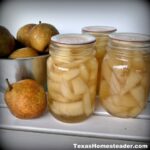
Fresh Pear Halves In Vanilla Syrup
One of my favorite ways to enjoy fresh pears is simmered in a light vanilla syrup. You can water-bath can it for 20-25 minutes and store those jars of goodness in the pantry too. #TexasHomesteader
Ingredients
- 35 cups Fresh pears Peeled, cored & halved
Light Syrup
- 6 cups Water
- 2 cups Sugar (3 cups sugar for a heavier syrup)
- 1½ teaspoons Vanilla Extract
Instructions
Instructions
-
Make light syrup (3 parts water to 1 part sugar) Boil 6 cups of water, then add 2 cups sugar and stir to dissolve. Boil for 3-4 minutes to completely dissolve sugar. Remove from heat & set aside.
-
Peel, core & halve fresh pears. If desired, drop prepared pears into fruit fresh solution to keep them from turning brown. (I typically just drop them in my simple syrup pot & give a stir)
-
When all pears and prepared, drain from fruit fresh solution (if using) and add pears to simple syrup. Boil about 5 minutes for hot-pack procedure.
Remove from heat & stir in 1½ teaspoons of vanilla extract.
Water-Bath Canning
-
Prepare 7 quart jars by washing and rinsing thoroughly. Heat jars either by placing in an oven set to 200 degrees or by adding water & placing jars in canner as it's heating. (This helps prevent the thermal shock of placing hot food in a cool jar)
-
Fill water-bath canner with water and place on the stove over medium-high heat. Boiling this much water takes quite a bit of time so start this step early.
-
Boil water in a small pan, remove from heat and drop in flat canning jar lids to soften the seals.
-
When pears are ready to can, place funnel atop hot canning jar and fill with hot pears. Top with syrup to within about 1/2" of the rim.
Run a small rubber spatula down alongside the edges of the jar to release any trapped bubbles. Top with more syrup if needed.
Wipe rim of jar with clean wet cloth to assure no syrup or food particles remain. Add canning jar flat lid and use canning jar ring to tighten finger tight. Add each lidded jar of pears carefully to the boiling water in the canner.
-
When all jars are added to the canner, assure the boiling water covers the top of the jars by at least 1". Then place the lid on top of your canner and bring the water to a boil.
-
Boil water 1" over jars for 25 minutes for quarts, 20 minutes for pints.
When canning time is up, turn off heat and allow jars to remain in the canner for 10 additional minutes. This helps equalize the pressure inside the jars reducing the chance that pears & syrup don't pressure themselves from beneath the lid when removing from the canner.
-
After 10 minutes rest time is up, carefully remove the jars of your canned pears and place on a towel on a countertop away from drafts. Allow to cool overnight.
-
The following morning test the seals by pressing gently on the center of each flat lid. If you hear a plinky noise when pressed, place that jar in the refrigerator and consume within a couple of days.
If no noise is heard when pressing the center of the flat lid, your jar of fruit has been successfully sealed. Remove the jar band, wipe down the jar to remove any syrup residue, label the contents and store in your pantry.
Recipe Notes
REUSABLE CANNING LID NOTE: Using Tattler reusable canning jar lids is slightly different than using traditional metal 1-time use canning jar lids. Per the Tattler site:
TATTLER REUSABLE CANNING LID USAGE
Tattler Lids do require a bit of variation from conventional metal lids. Being a two piece combination with a rubber gasket ring, Tattler Lids must remain a bit loose during processing in order for the jar to vent the pressure that has built in the jar during processing. An online customer gave us a very good tip on how tight is 'Just Right'. To get the feel for the correct tightness prior to processing, place the jar on a counter top or other smooth surface, then place your index finger on the lid (do not apply too much pressure while tightening the metal band). Screw the metal band on until the jar begins to spin on the counter top (or other smooth surface). This is the perfect tightness for processing!
THE FOLLOWING FINAL STEP IS CRUCIAL TO ENSURE A GOOD SEAL:
Once the process is completed and the jars are removed from your canner, Let the bubbling die down (approximately 4-5 minutes), as this is pressure still releasing from the jars. Place a towel over the still hot jars (for safety) and finish tightening the metal bands. Now, let your jars cool naturally and when cool to room temperature, remove the metal band and lift the jar slightly by the lid. It should be well sealed. Your food is ready for storing (store without metal screw bands).